O2A SAMPLES User Guide
Overview
Welcome to the O2A SAMPLES System User Guide. This document provides comprehensive instructions on how to use O2A SAMPLES effectively for managing and organizing your samples.
Before accessing the system’s features, users must log in with their designated credentials. The login ensures secure access to your workspace and enables you to view, create, and manage sample information according to your permissions.
There are two O2A Sample System avaiavble for users:
Test system: samples-test.o2a-data.de
Productive system: samples.o2a-data.de
Test System
The test system serves as an initial entry point for users to become familiar with the system and to try out available features. Data entered in the test system is temporary and is deleted on a regular basis. This allows users to experiment with the system without affecting any real data. The test system is ideal for learning how to navigate the interface, understanding the functionalities, and testing different scenarios before working with actual sample data in the productive system.
Productive System
The productive system is used for managing actual sample metadata. It is the environment where users can create, view, and manage real sample information. Data entered in the productive system is persistent and is not deleted regularly, ensuring that all sample information is securely stored and accessible for ongoing work. Users should use the productive system for all actual sample management. Additionally, the productive version is used to reset the test system. This means that everything entered into the productive system will also appear in the test system, but not vice versa.
The user guide is structured into two main blocks (A and B). Block A introduces the core functionalities of O2A SAMPLES, including navigation, sample creation, and basic management tasks. Block B covers additional features such as querying samples based on specific criteria and working with more advanced tools within the system.
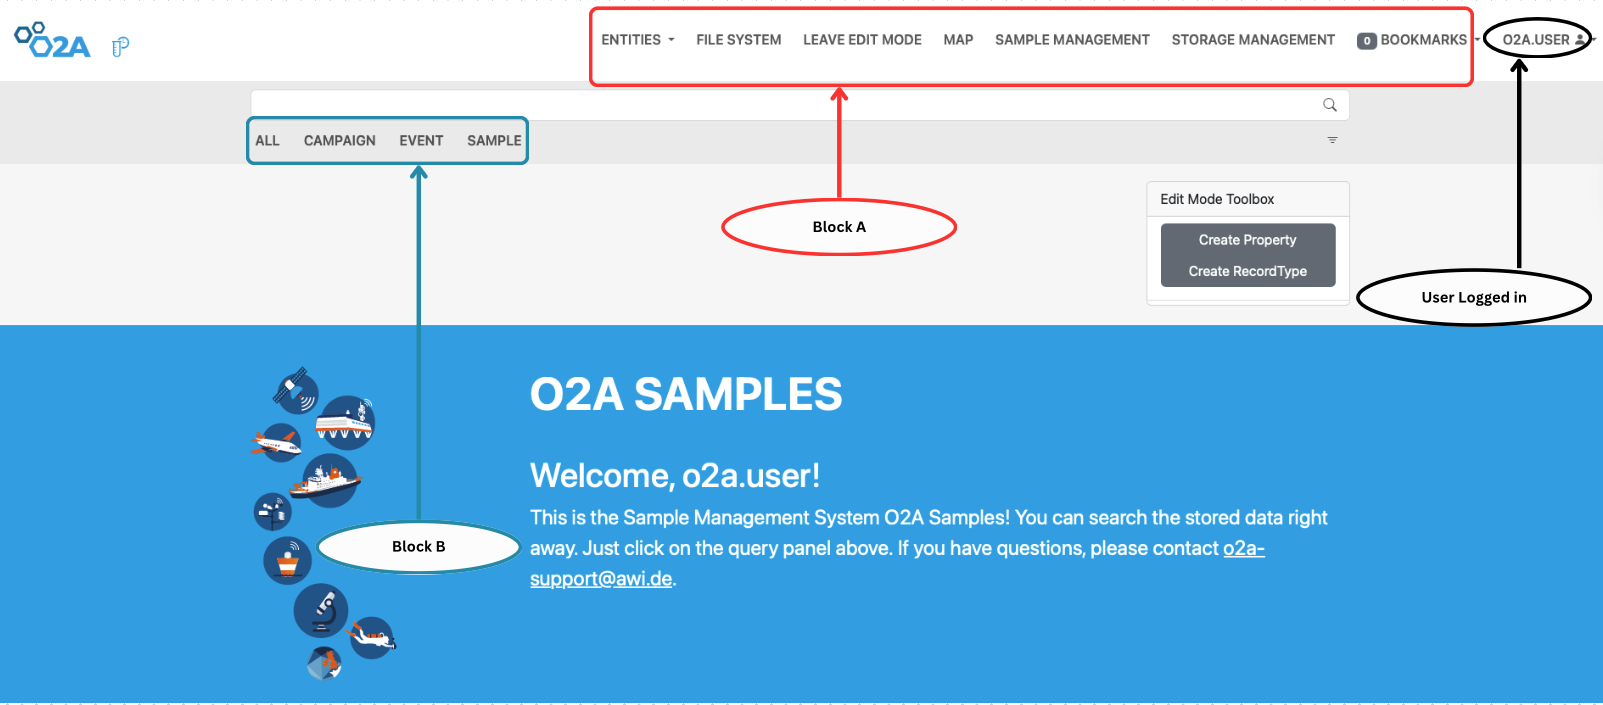 Overview of the O2A SAMPLES system. Block A (red) shows the main navigation menu and user login status. Block B (blue) displays sample categories via graphical icons. The central panel includes search filters, editing tools, and a welcome message guiding users to begin querying stored sample data.
To help you find your way through the user guide, you’ll find brief descriptions of key terms below:
Key Terms
| Term | Description |
|---|---|
| Samples | Actual physical samples that are described and identified by a set of descriptive properties. |
| Parent Samples | Physical samples such as material,substance or biological specimen that are collected during research. They are represented digitally by associated metadata. |
| Child Samples | These are samples obtained from physical parent samples. They can be derived from processing or transforming a parent sample. |
| Record | Actual stored data. |
| RecordType | This define classes or types of things, e.g., persons, experiments, time series. Can be viewed as member of the class defined by recordType |
| File | Stored file associated with the records. |
| Register | To create a new entry into O2A SAMPLES. |
| Upload | To add file to O2A SAMPLES. |
| Export | To export created file in a chosen format. |
| Container | Physical holders used to store or transport physical samples. |
| Entities | These are base object, which can be recordtype,record or abstract properties and has unique server generated ID. |
| EventType | Eventtype are usually implemented as a RecordType or a Property. It is used to categorize and manage structured data, particularly for tracking experimental workflows and sample life cycle. |
Block A
Entities
The Entities drop down menu can be used to retrieve all the imputed Entities, including RecordTypes, Records, Properties and Files. On the navigation bar, click on the Entities menu to access the different sub-menus. Once clicked, a drop-down menu will appear showing the different sub-menus available under the Entities menu. Within each sub-menu, you can view, edit, delete or create new Entities as needed. Also you can directly create new RecordTypes or Property by clicking on the Edit Mode Toolbox menu seen at the right side of the page.
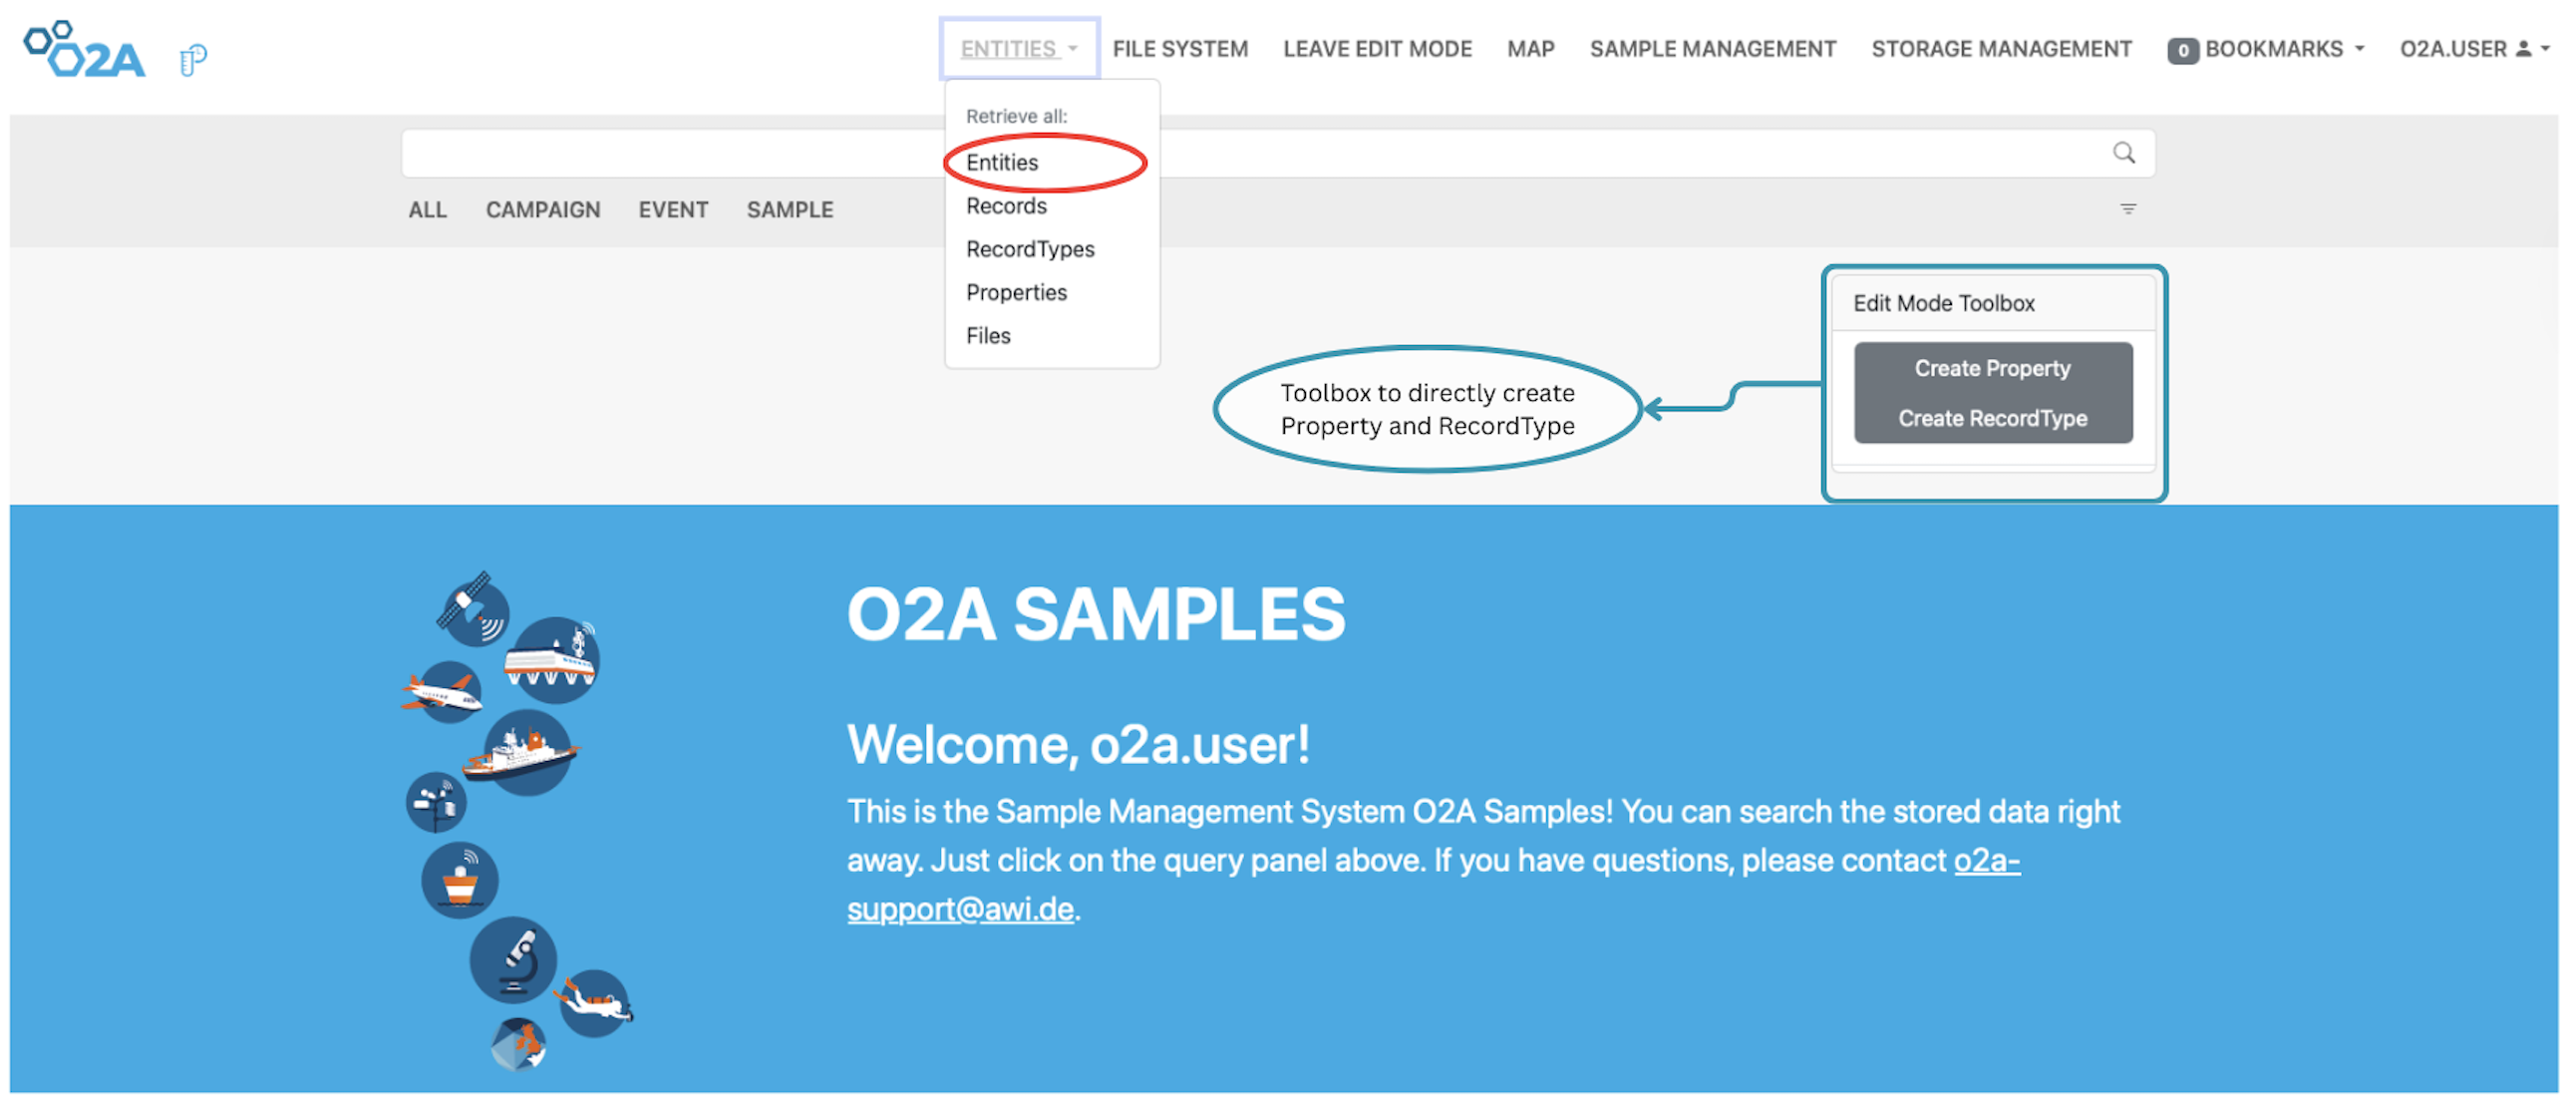 Interface view of the O2A SAMPLES system with expanded navigation and edit tools. The "Entities" dropdown is open, highlighting options for retrieving and managing data structures. The Edit Mode Toolbox allows direct creation of properties and record types. A welcome message guides users to begin querying sample data and provides support contact information.
Each sub-menu under the Entities menu is labeled with a shorthand identifier:
- R – Records
- RT – RecordTypes
- P – Properties
- F – Files
To view the contents of any category, simply click on the corresponding sub-menu. For example:
- Clicking on Records (R) displays a list of all records stored in the sample management system.
- Clicking on RecordTypes (RT) shows all defined record types.
- Clicking on Properties (P) reveals the available metadata properties.
- Clicking on Files (F) opens the file repository.
Records:
This sub-menu allows you to view all the Records in O2A SAMPLES. You can also search for specific Records using the search bar at the top of the page.
 O2A SAMPLES System: Record interface view
RecordTypes:
This sub-menu allows you to view all the RecordTypes in O2A SAMPLES. You can also search for specific RecordTypes using the search bar at the top of the page.
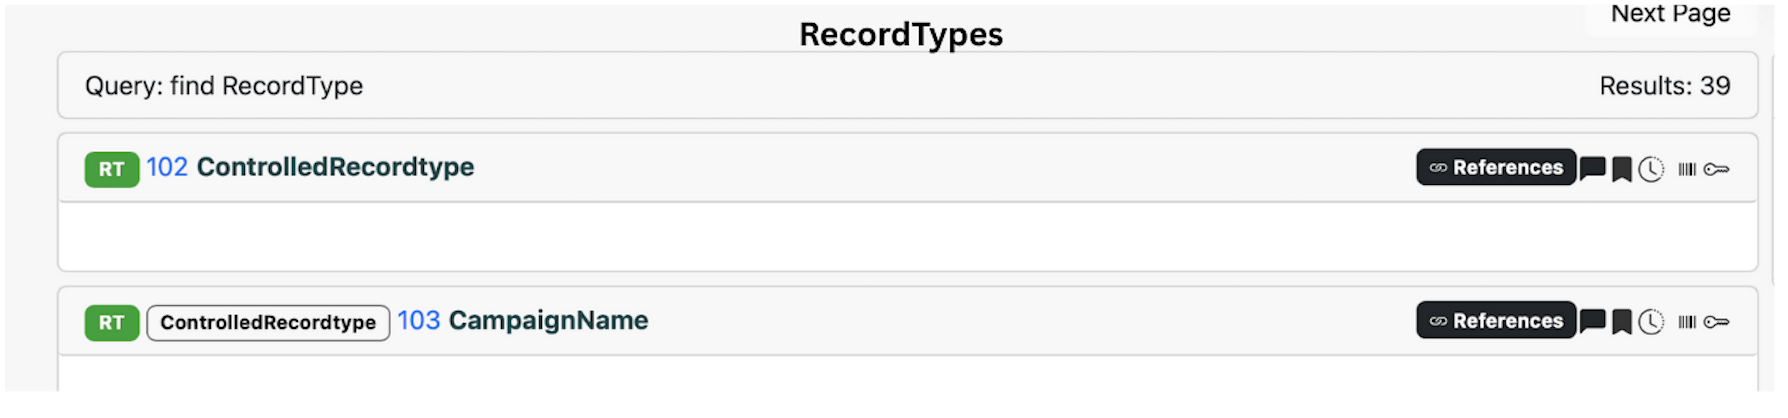 O2A SAMPLES SYSTEM: RecordTypes interface view
Properties:
This sub-menu allows you to view all the Properties in O2A SAMPLES. You can also search for specific Properties using the search bar at the top of the page.
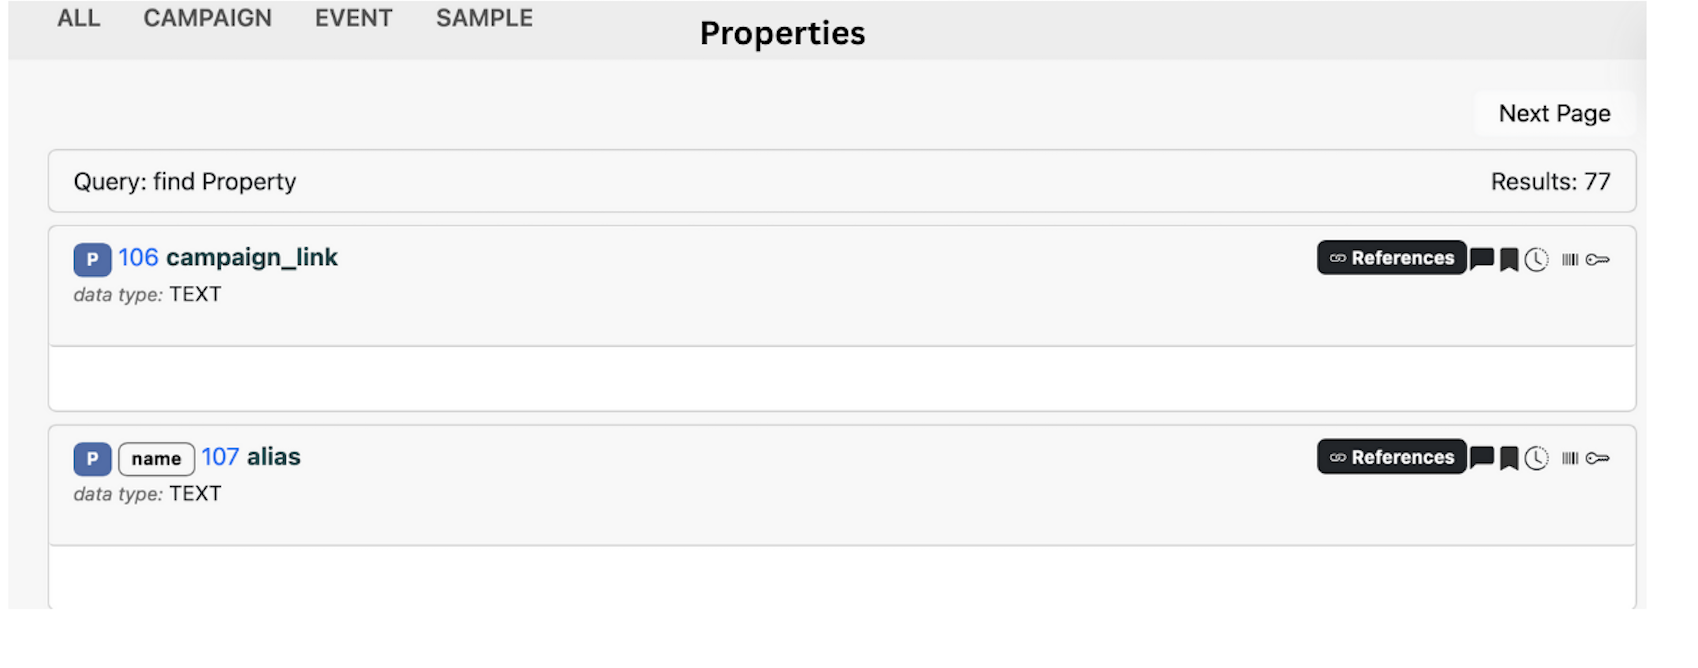 O2A SAMPLES SYSTEM: Properties interface view
Files: This sub-menu allows you to view all the Files in O2A SAMPLES. You can also search for specific Files using the search bar at the top of the page.
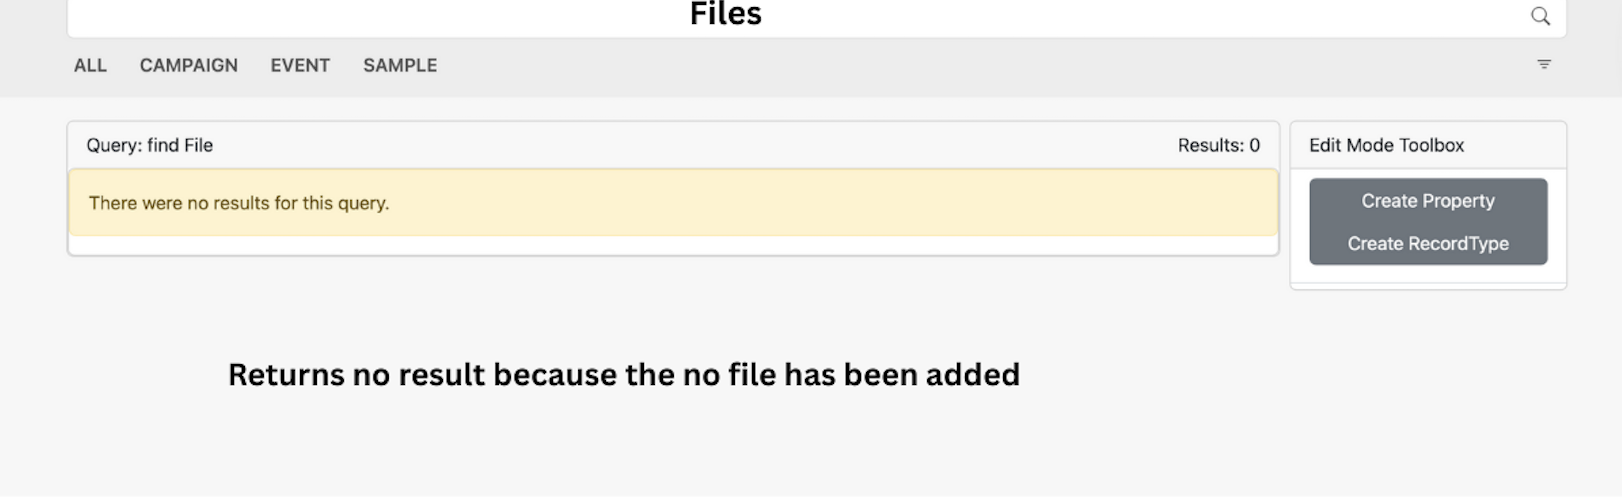 O2A SAMPLES SYSTEM: Files output view without results
File System
You can upload files to the file system from your local machine by clicking the Upload File button. All uploaded files will appear in this section. Next to the Entities menu, you will find the File System menu, where files can be added. Files are uploaded according to their RecordType, allowing you to attach them to the appropriate category within O2A SAMPLES.
Steps to upload a file to the File System
Step 1: Click on the File System menu in the navigation bar to open the file system page. You will see a green button with a + symbol: click this button.
Step 2: Select the RecordType you want to upload the file to from the drop‑down menu.
Step 3: Click the Choose File button and select a file from your local computer.
Step 4: Click the Submit button to upload the file to O2A SAMPLES.
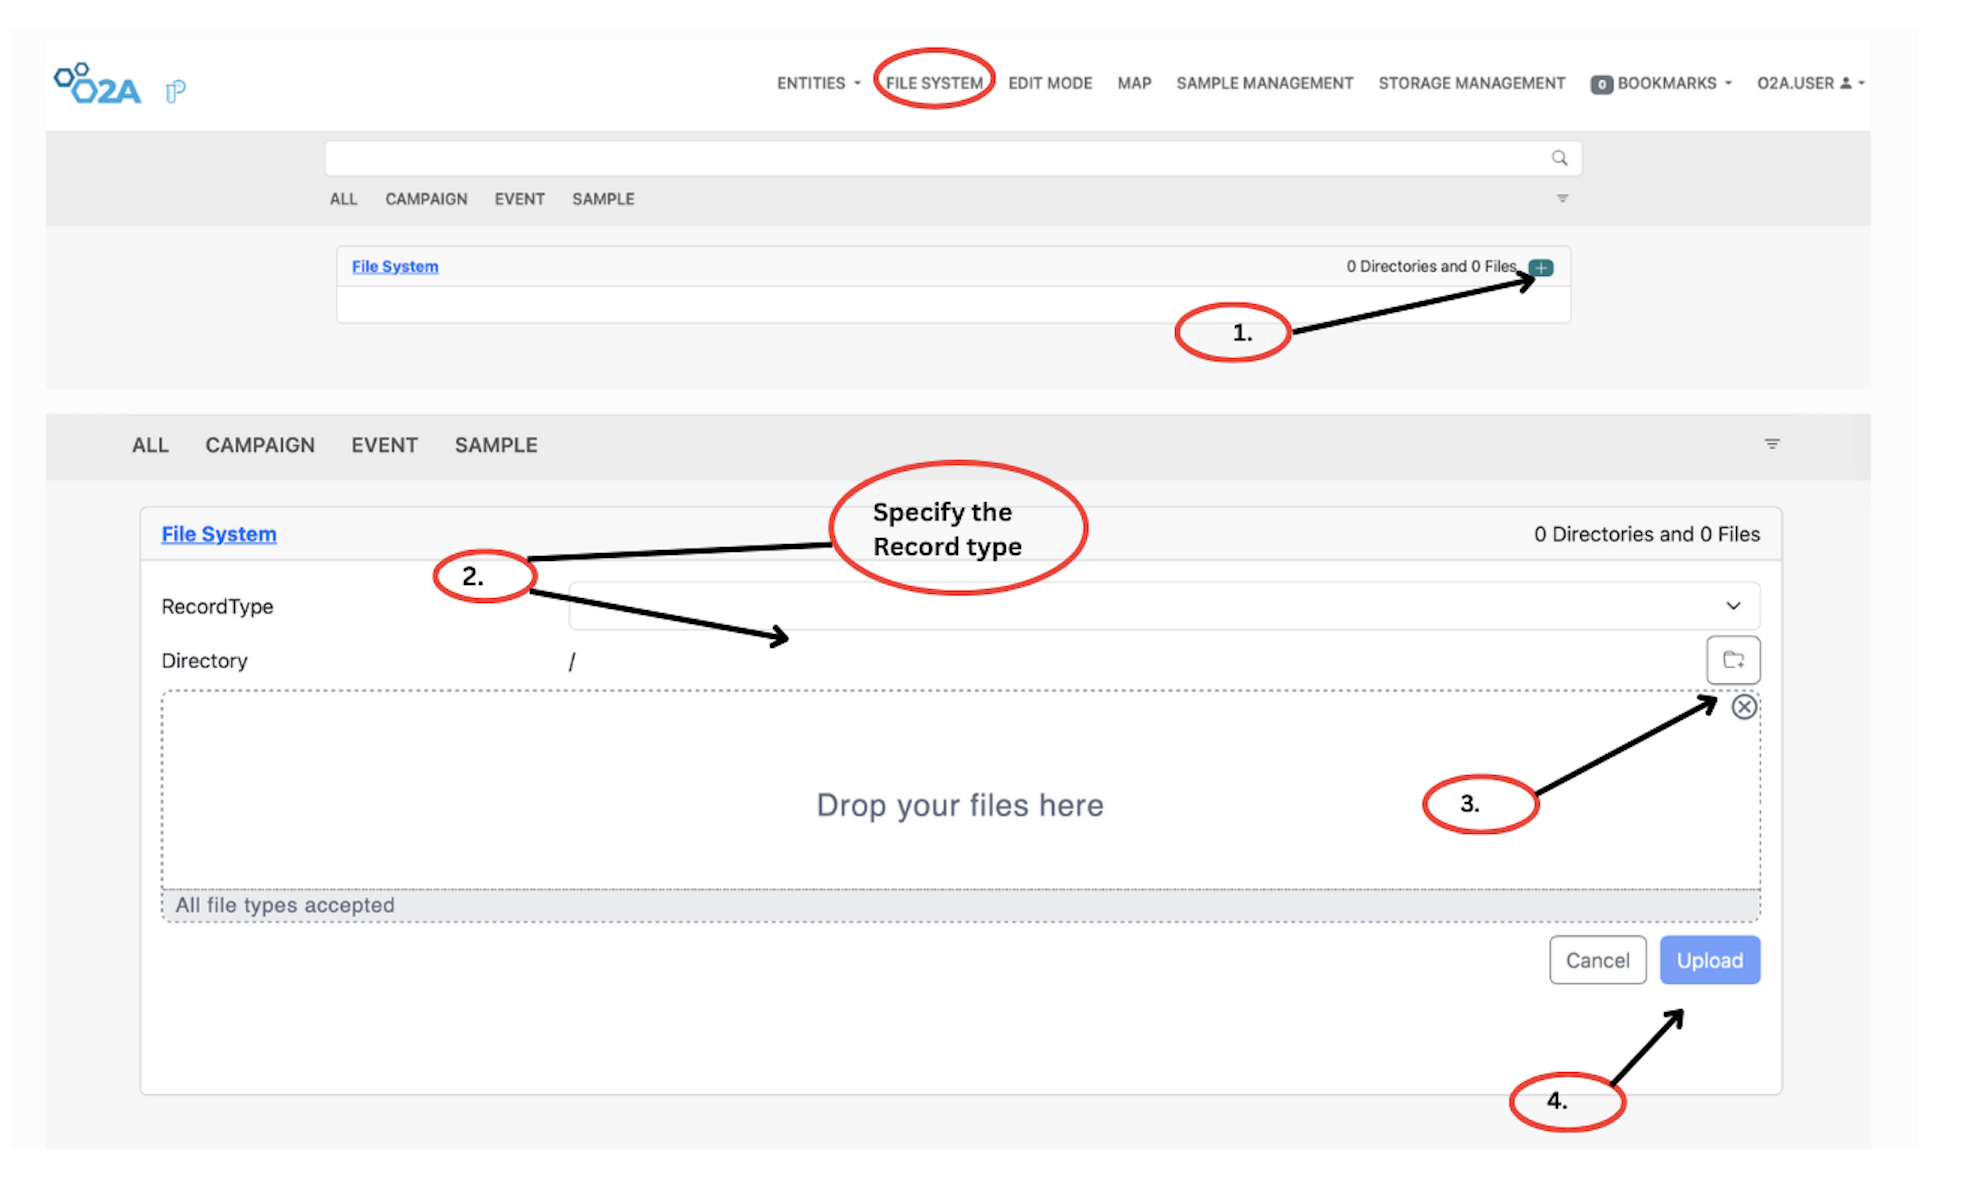 O2A SAMPLES SYSTEM: Outlined Form with steps on uploading files
Edit Mode
Although the Edit Mode appears as a pop-up on most pages, its primary purpose is to create new RecordTypes or Properties within the sample management system. To access the Edit Mode menu, click the Edit Mode icon located at the top right corner of the navigation bar, next to the File System menu. This opens a pop-up window where you can choose to create either a new RecordType or a new Property. Fill in the required details in the form and click Submit to complete the creation process.
Steps to create a new RecordType
Step 1: Click the Edit Mode icon in the navigation bar to open the Edit Mode pop-up window.
Step 2: Drag a property from the list into the creation area to begin defining the new RecordType.
Step 3: Click Submit to finalize and create the new RecordType.
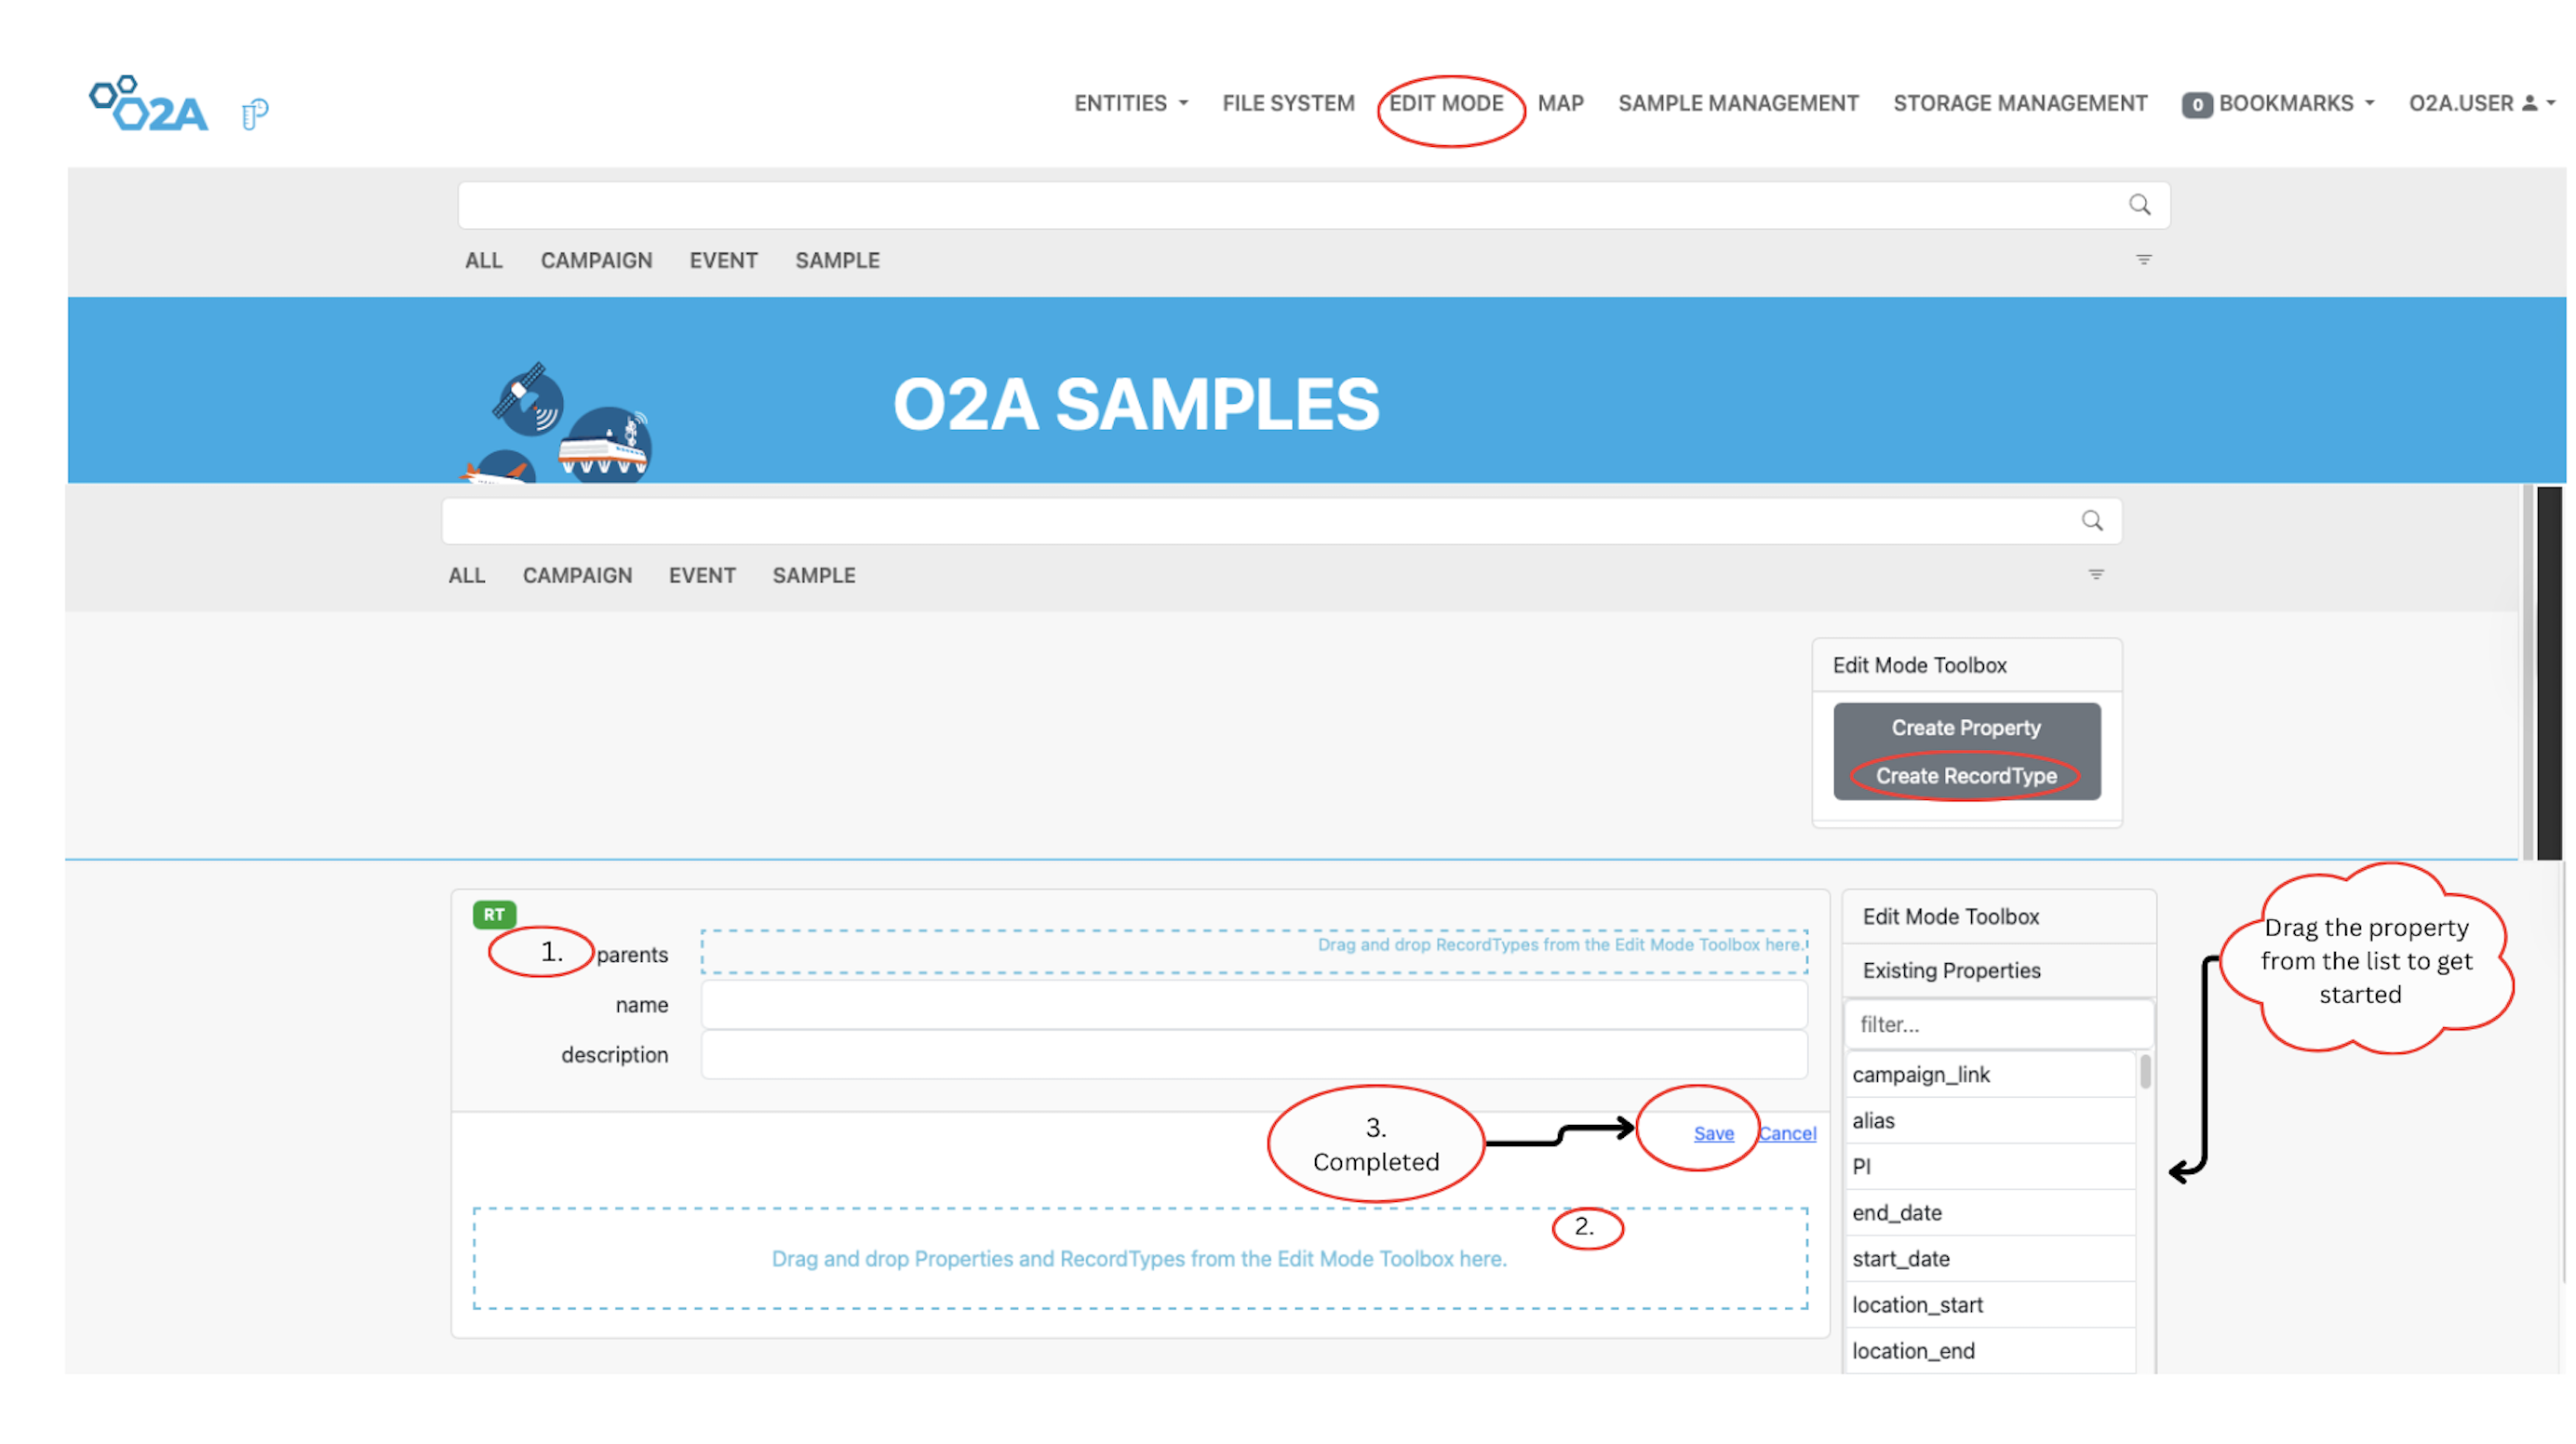 O2A SAMPLES SYSTEM: Steps on how to create new RecordType
Steps to create a new Property
Step 1: Click the Edit Mode icon on the navigation bar to open the Edit Mode pop-up window.
Step 2: Select the Property option from the pop-up window.
Step 3: Fill in the required details for the new Property, such as its name, decription, and data type.
Step 4: Click Submit to create the new Property in the system.
 O2A SAMPLES SYSTEM: Steps on how to create new Property
Sample Management
Under the Sample Management menu, you can manage your samples by registering new samples, viewing existing ones, exporting sample data, and upload sample information from your local machine. The Sample Management menu is located directly after the Map menu in the navigation bar.
Once you click on Sample Management, you will see several sub-menus. Each sub-menu provides access to specific actions related to sample management, allowing you to work with your data in a structured and efficient way.
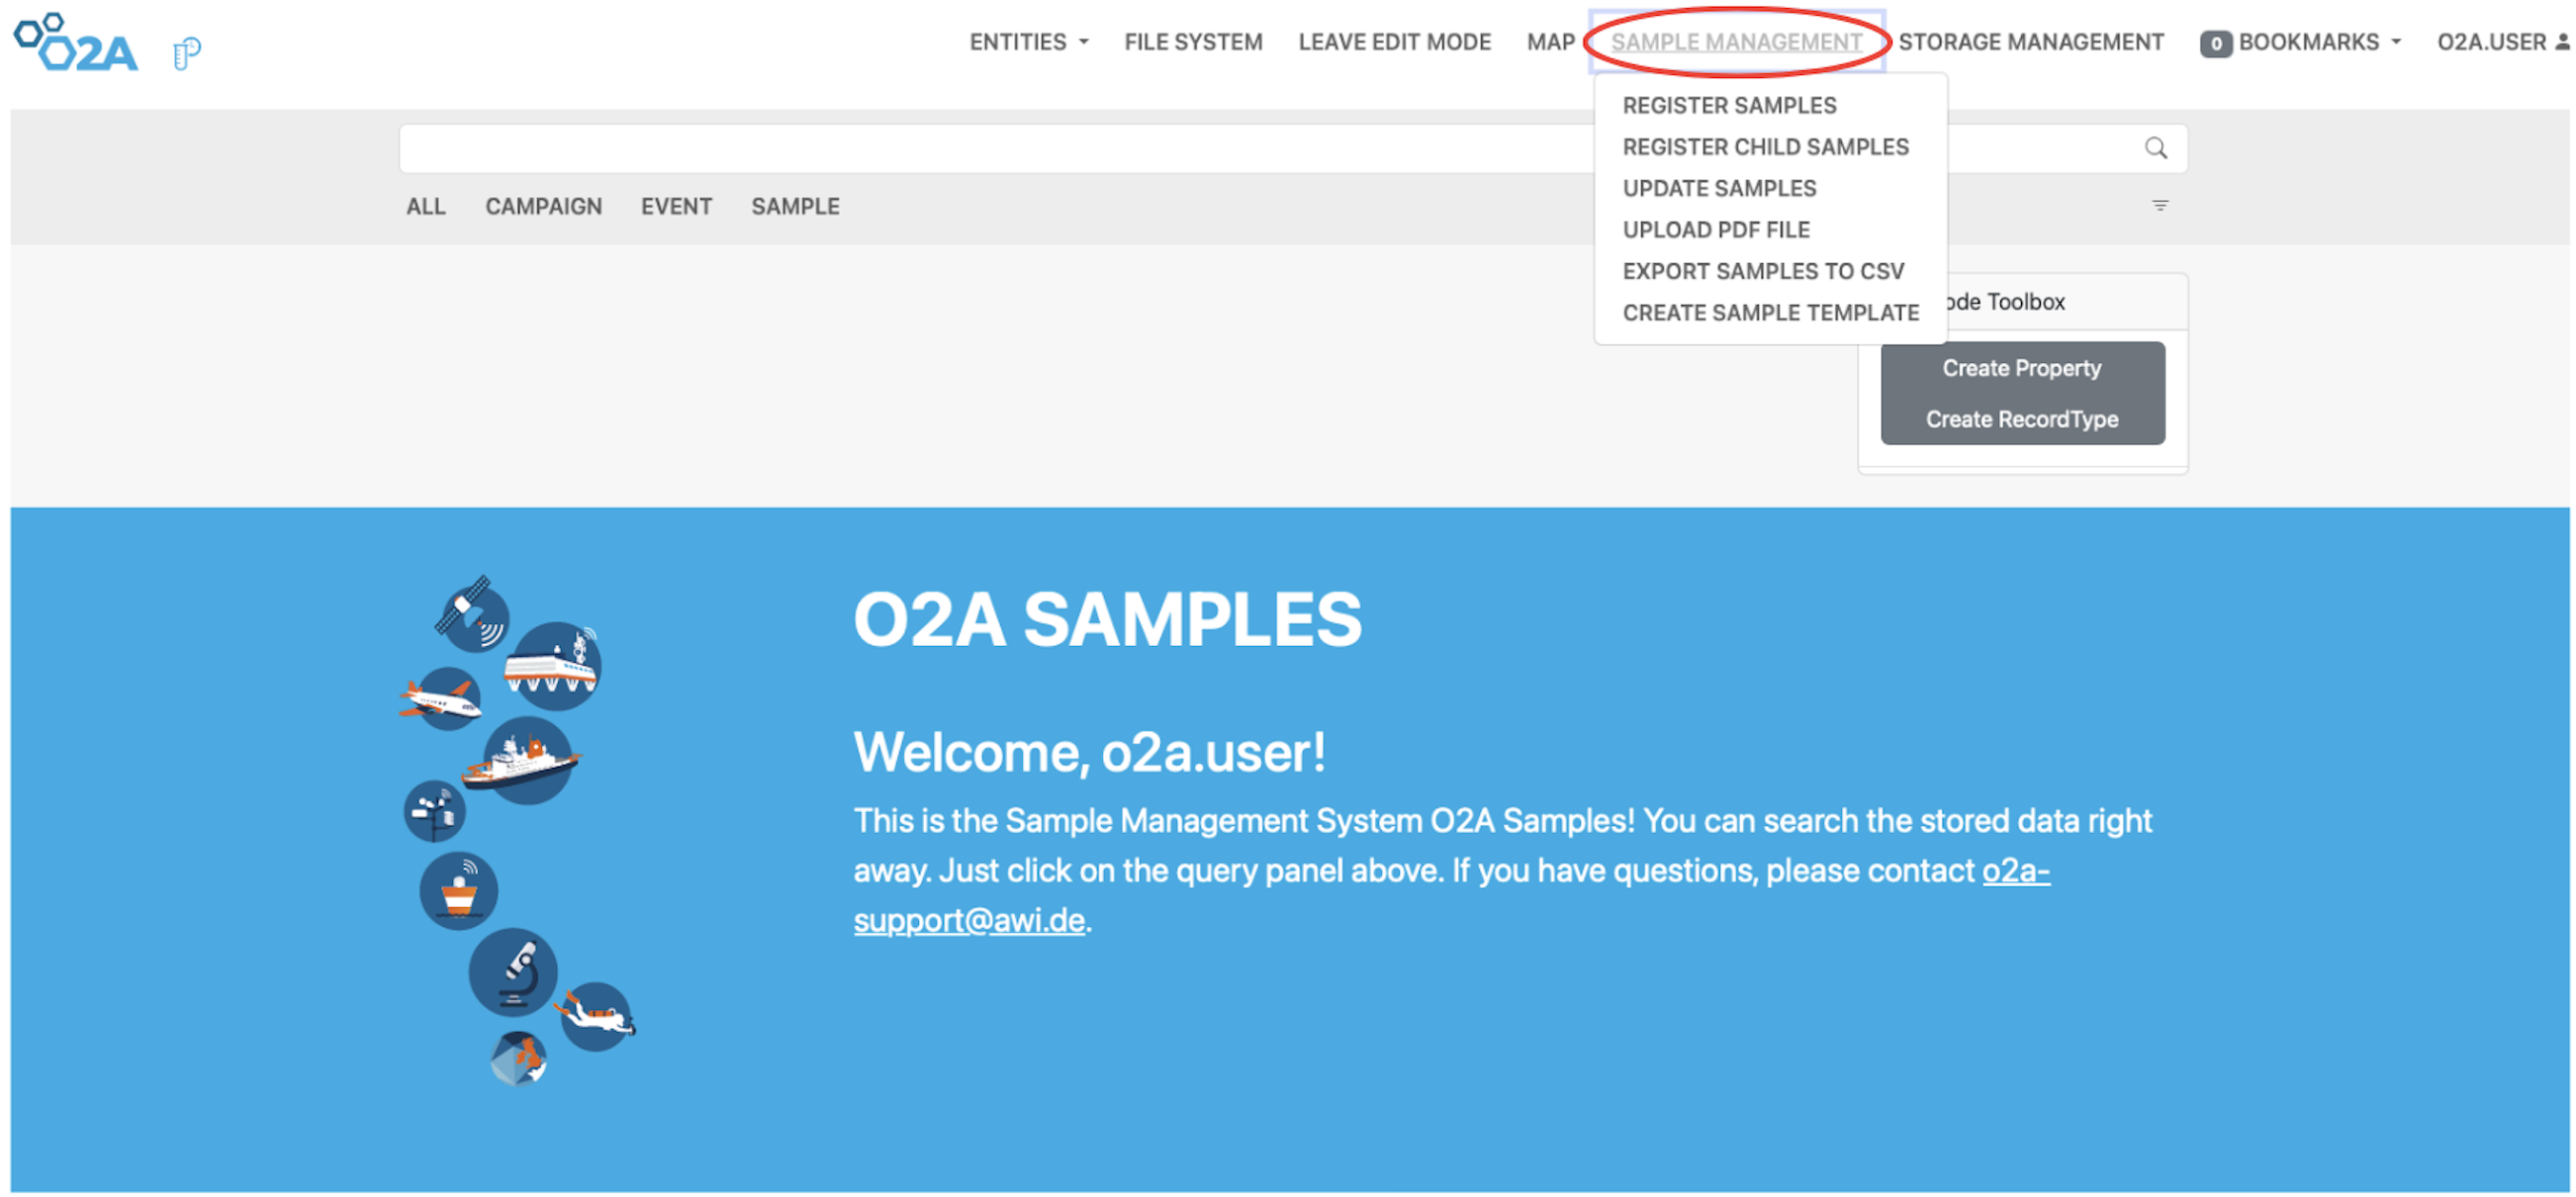 Expanded view of the Sample Management menu in the O2A SAMPLES system.
Sub-menu options include registering samples, updating sample data, uploading PDF files, exporting to CSV, and creating sample templates. This section enables users to manage sample records efficiently within the system.
Register Sample
To register a new sample, click the Register Sample button under the Sample Management menu. A pop-up form will appear to guide you through the registration process. The first field in the form is the Template field, which is optional. You can select a pre-existing sample template to standardize your registration. Once a template is selected, some columns may be auto-filled based on its configuration. The remaining fields are mandatory and must be completed before submitting the form. After entering your name, you’ll need to select both required and additional columns to include in your sample registration. Once all necessary details are filled in, click the Submit button to complete the registration.
Steps to register a sample
Step 1: Click the Register Sample button. A pop-up form will appear. In the first field, optionally select a sample template from the drop-down menu.
Step 2: Enter your name in the User Name field.
Step 3: Select the required columns from the Required Columns field.
Step 4: Select any additional columns from the Additional Columns field.
Step 5: Click the Submit button to register the sample.
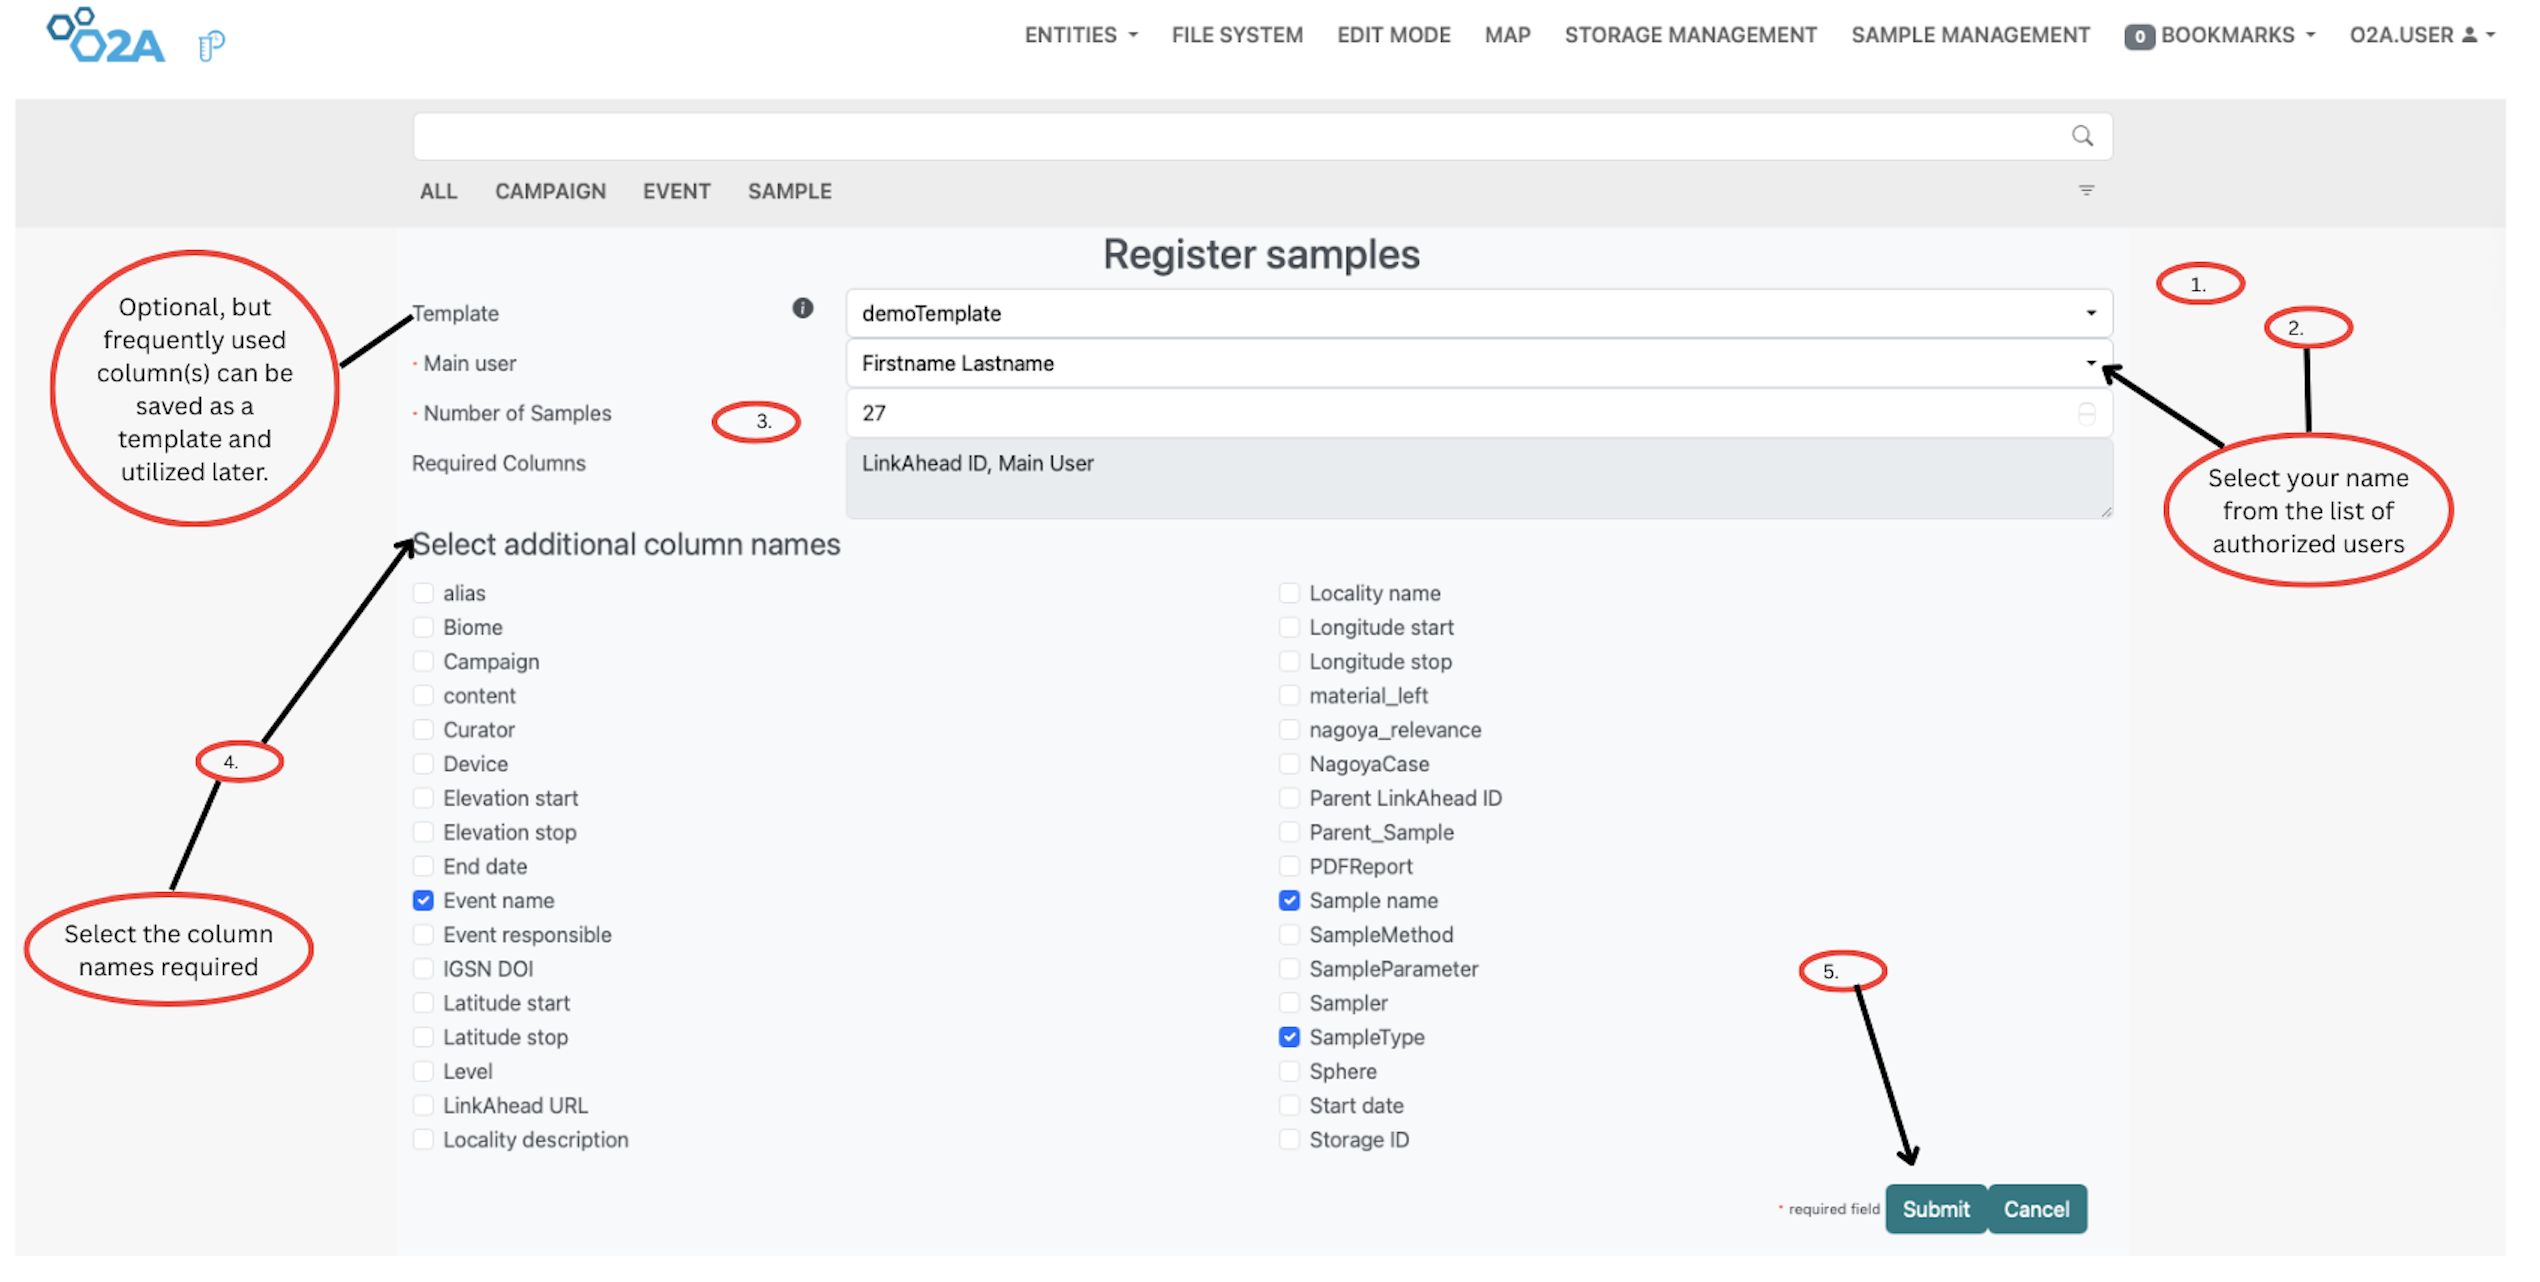 O2A SAMPLES SYSTEM: Steps on how to register a sample(s) Users can optionally select a template, enter their name, choose required and additional columns, and submit the form to register new samples in the system. The interface is designed to streamline the sample registration process while ensuring that all necessary information is captured accurately.
Register Child Sample
To register a child sample, click the Register Child Sample button under the Sample Management menu. A pop-up form will appear where you can enter the required details. The child sample registration form is similar to the parent sample registration form, but includes an additional field for selecting the parent sample from which the child sample is derived. After completing all required fields, click Submit to register the child sample.
Steps to register a child sample
Step 1: Click the Register Child Sample button. A pop-up form will appear. In the first field, enter your username as registered in the portal.
Step 2: Enter the number of child samples you want to register.
Step 3: Select any additional columns you want to include in your child sample registration form from the Additional Columns field.
Step 4: Click Submit to complete the child sample registration.
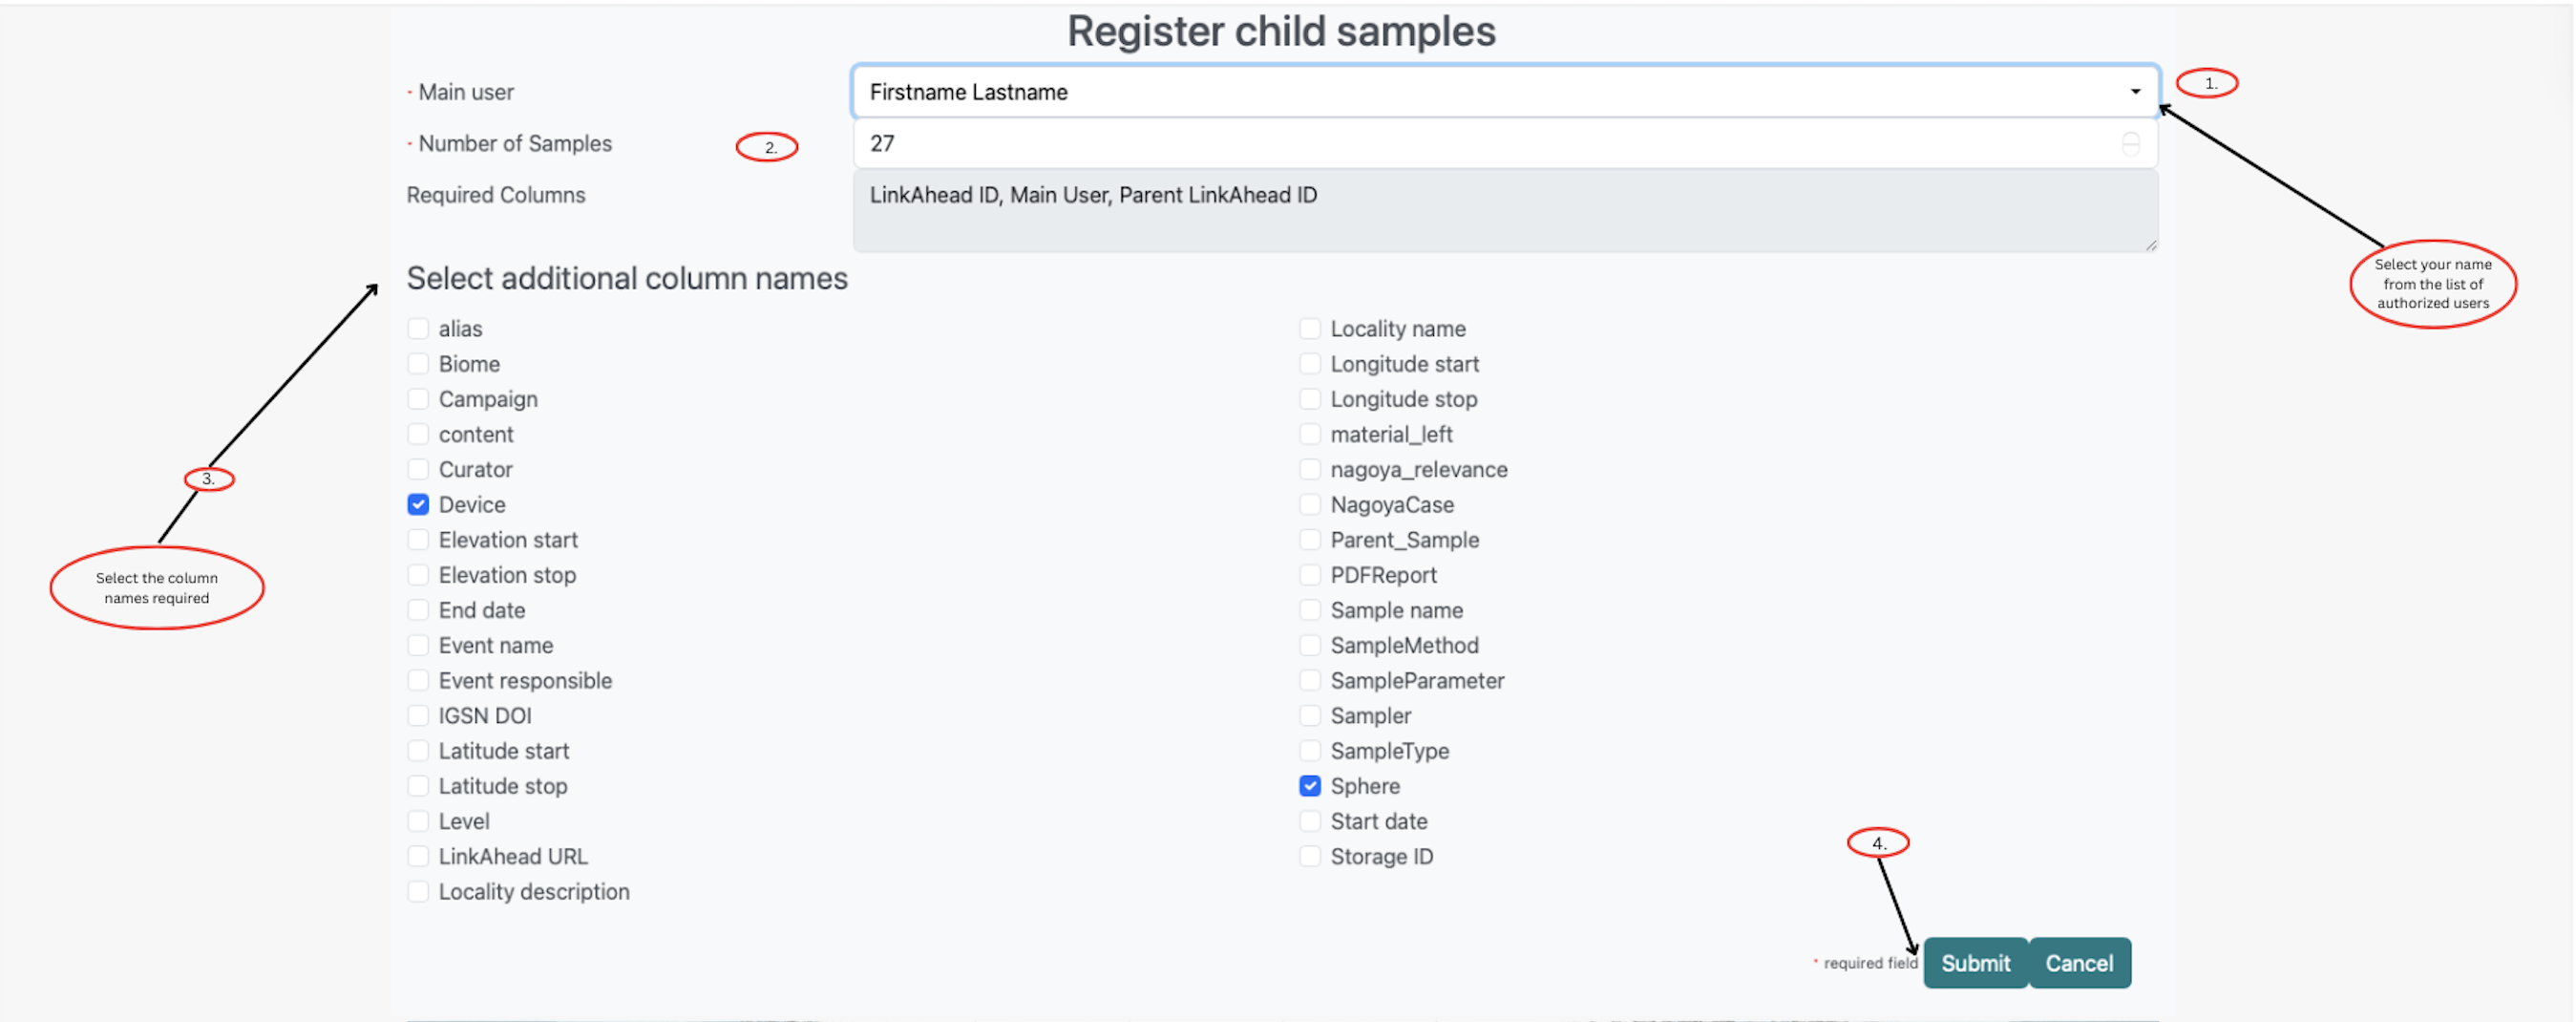 Child sample registration form in the O2A SAMPLES system. Users select their name, specify the number of child samples, choose required and additional columns, and submit the form. This interface streamlines the process of linking child samples to parent records within O2A SAMPLES.
Update Sample
With the Update Sample feature, you can modify existing sample details in the sample management system. Follow the steps below to update a sample using a template from your local computer.
Steps to update a sample
Step 1: Click the Update Sample button under the Sample Management menu. A pop-up window will appear where you can import a template file from your local machine. Choose the appropriate or updated document.
Step 2: After selecting the file, click the Submit button to apply the changes and update the sample details in the system.
 Update sample form in the O2A SAMPLES system. Users can select required columns and upload a completed template from their local machine to modify sample data. The form includes a file upload field, a link to the sample import template, and a Submit button to apply updates.
Upload Pdf File
You also have the ability to upload a PDF file to the sample management system.
Steps to upload a PDF file
Step 1: Click the Upload PDF File button under the Sample Management menu. A pop-up window will appear where you can select a PDF file from your local computer.
Step 2: After selecting the PDF file, click the Submit button to upload it to the sample management system.
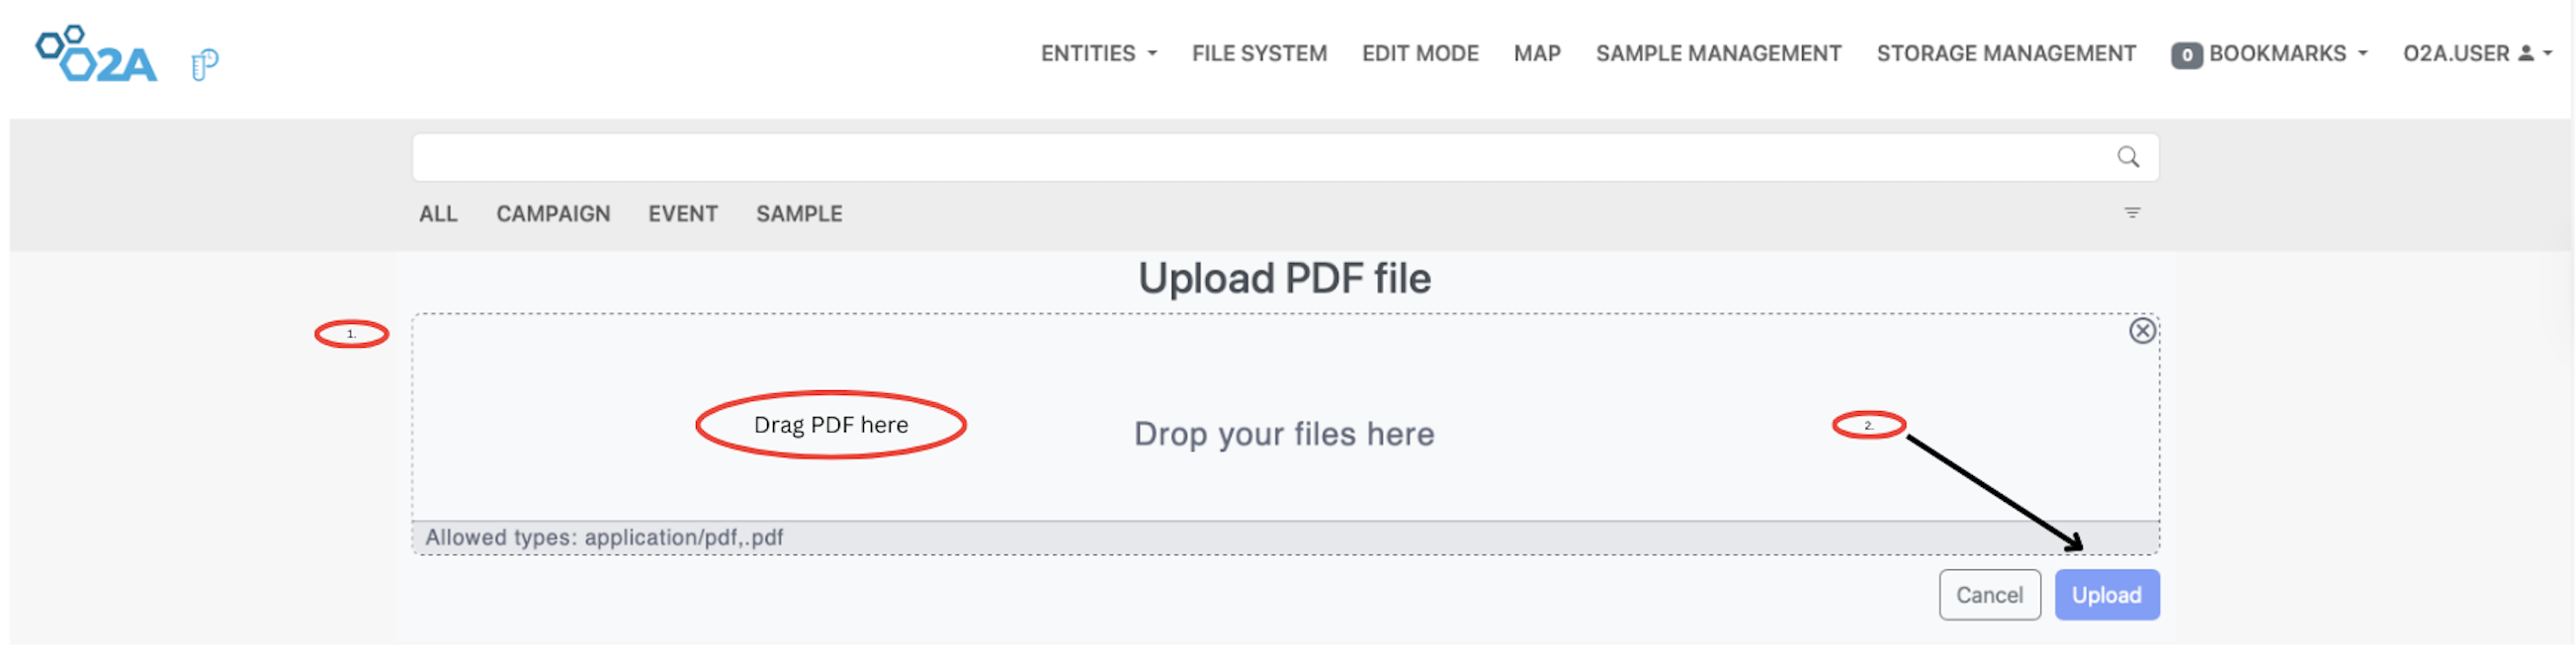 PDF upload interface in the O2A SAMPLES system.Users can drag and drop a PDF file or select one from their local machine. Allowed file types are
 .pdf, and the process is completed by clicking the Upload button. Navigation options are visible at the top, including Sample Management and File System.
Export Sample to CSV
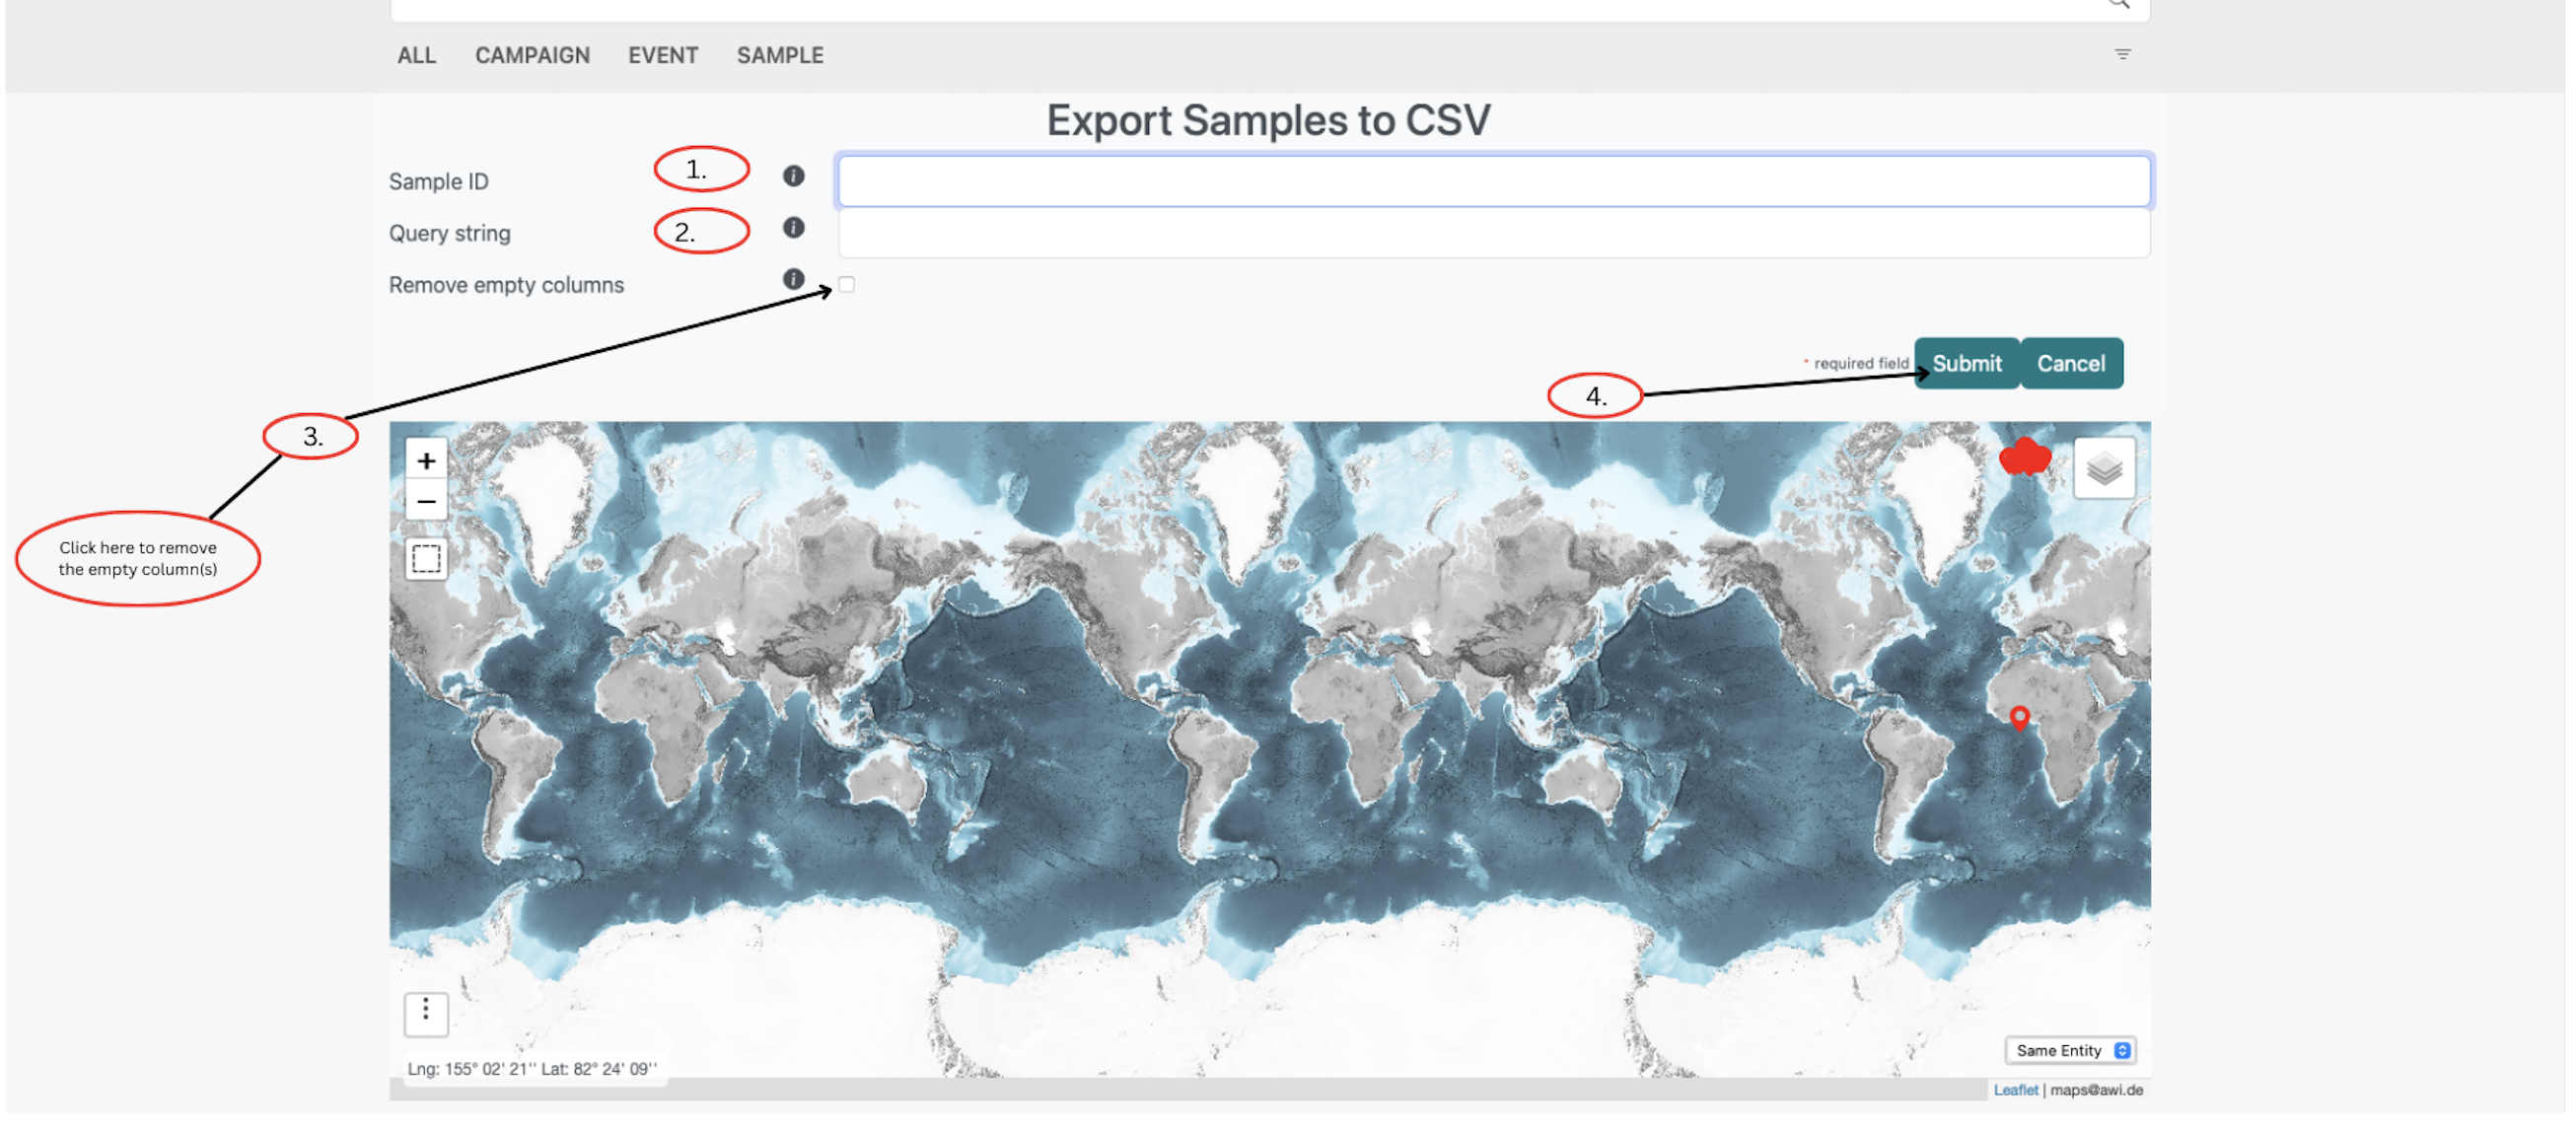
You can export sample data to CSV format for further analysis or reporting. To export a sample, click the Export Sample to CSV button under the Sample Management menu. A pop-up window will appear where you can enter the Sample ID and the Query for the data you want to export. If you wish to exclude empty columns from the export, check the Remove Empty Columns box. Finally, click the Submit button to export the sample data in CSV format.
Steps to export sample data to CSV
Step 1: Click the Export Sample to CSV button under the Sample Management menu. A pop-up window will appear. In the first field, enter the Sample ID.
Step 2: Fill in the Query field with the appropriate query for the data you want to export.
Step 3: To exclude empty columns from the export, check the Remove Empty Columns box.
Step 4: Click the Submit button to export the sample data in CSV format.
 O2A SAMPLES SYSTEM: Steps on exporting samples to CSV
Create Sample Template
Sample templates can be created to standardize the sample registration process. They allow frequently used columns to be pre‑defined, making it easier and faster to register new samples.
Steps to create a sample template
Step 1: Click the Create Sample Template button under the Sample Management menu. In the first field of the pop‑up form, enter the name of the new template.
Step 2: Fill in your name in the User Name field.
Step 3: Select the required columns you want to include in the template from the Required Columns field.
Step 4: Click the Submit button to create the sample template.
 O2A SAMPLES SYSTEM: Steps on how to create a sample template
Storage Management
The Storage Management menu allows you to manage storage containers for your samples. You can create new containers, view existing ones, and organize the contents of each container efficiently.
Steps to register a container
Step 1: Click the Storage Management menu in the navigation bar to open its options. Select Register from the sub‑menu. In the first field of the pop‑up form, enter the name of the container you want to register.
Step 2: Choose the appropriate Container Type from the drop‑down menu.
Step 3: Enter the dimensions of the container in the Dimensions field.
Step 4: Specify the number of containers you want to register.
Step 5: Select the template file format you want to use for the registration (e.g., CSV, XLSX).
Step 6: Optionally, specify a parent container if the new container is a sub‑container.
Step 7: Click the Submit button to complete the container registration.
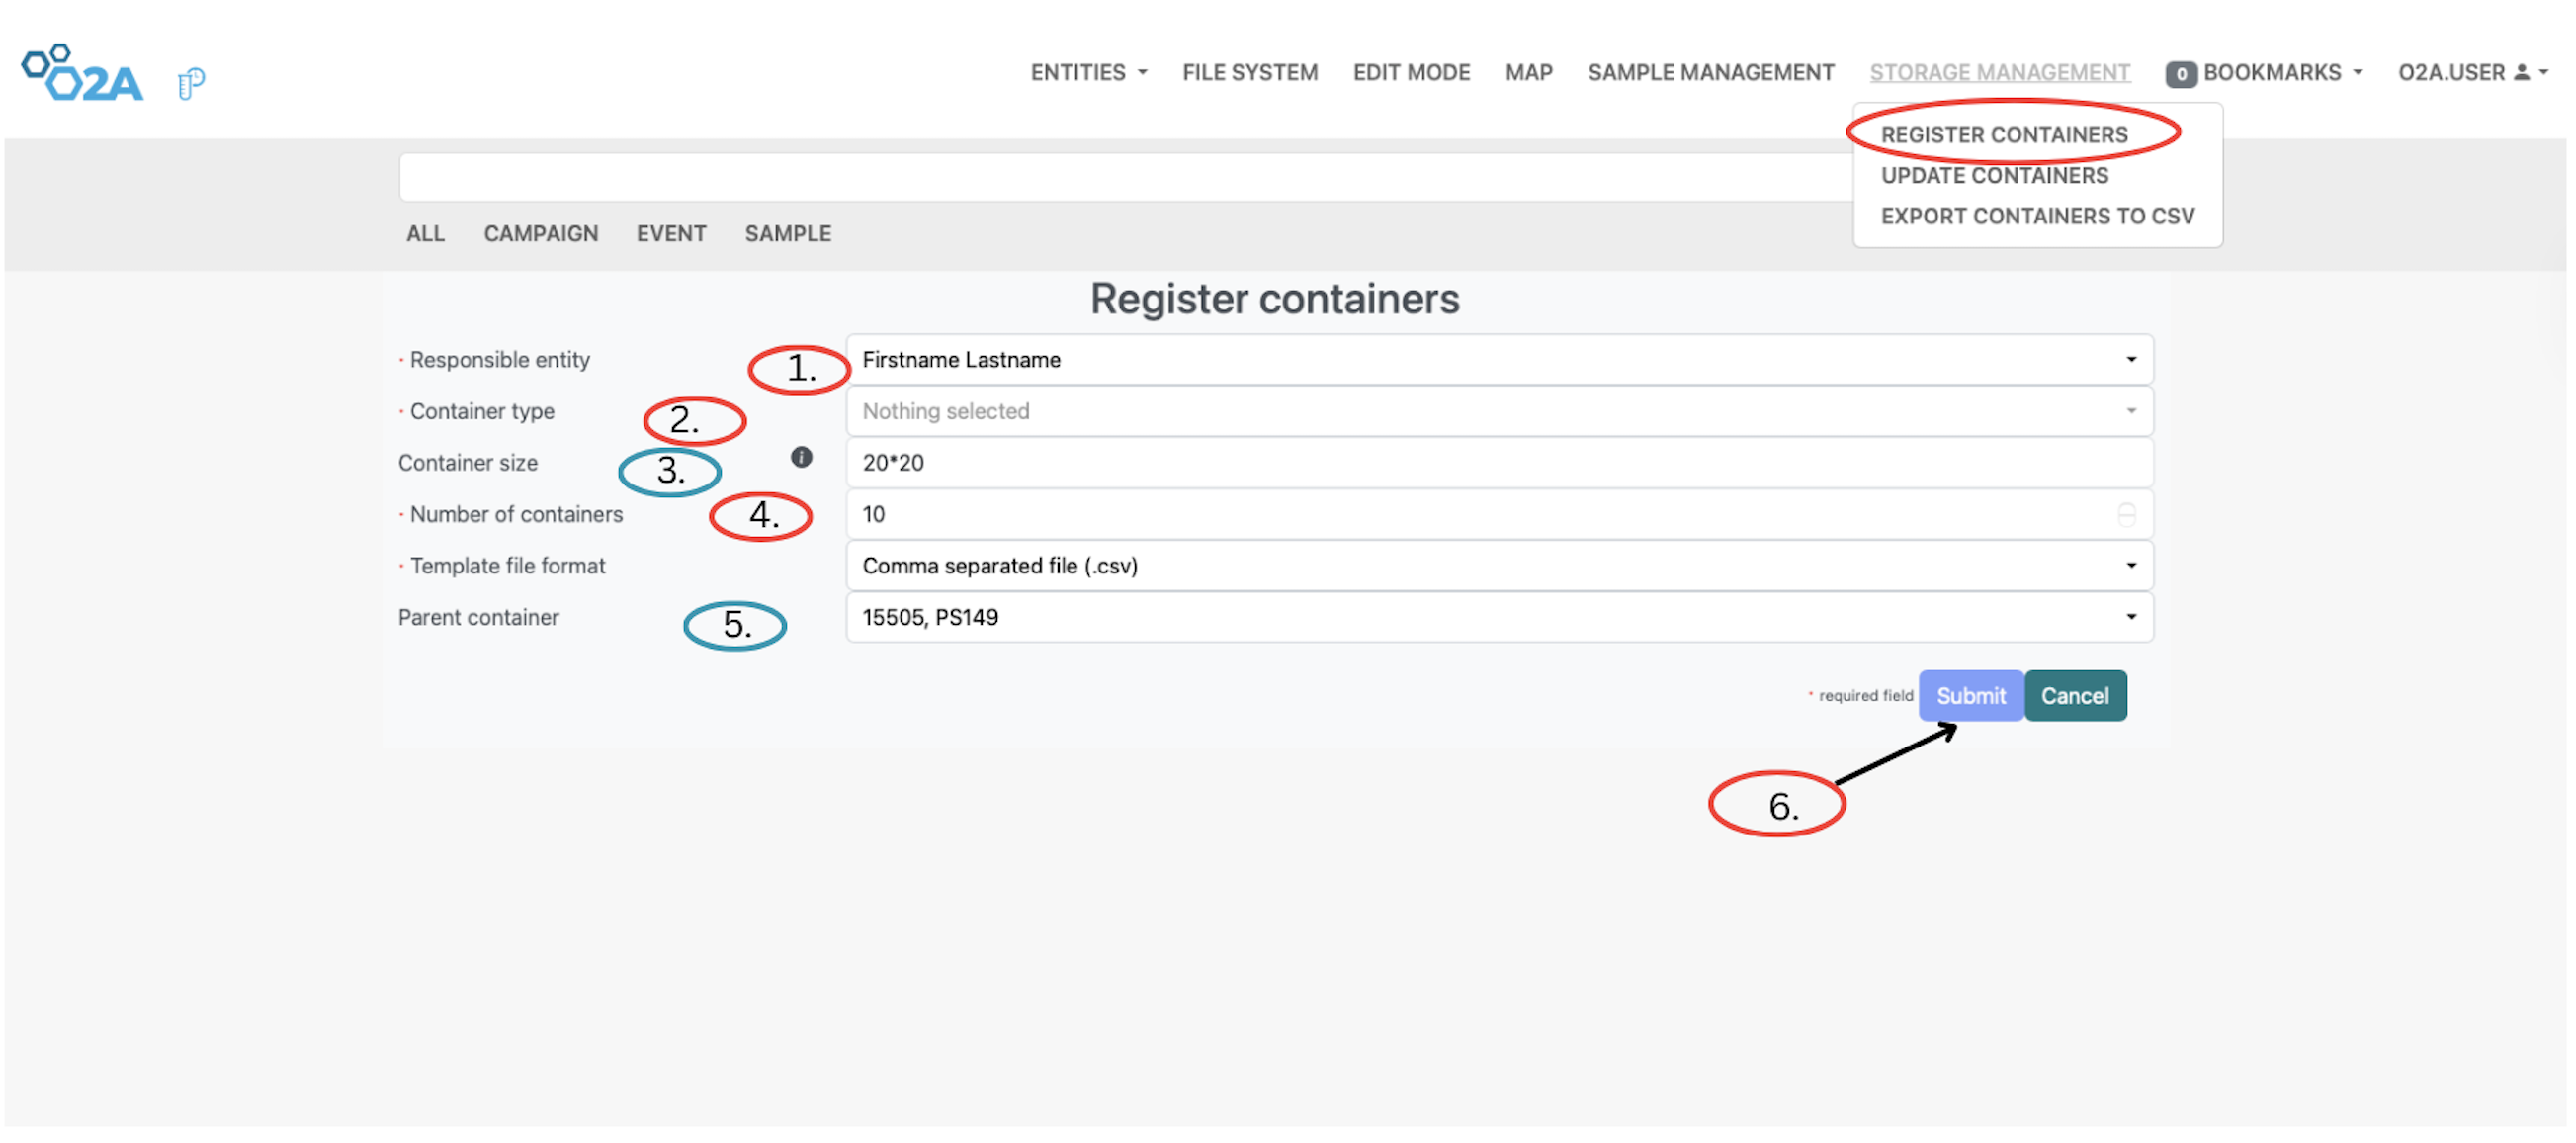 O2A SAMPLES SYSTEM: Steps on how to register a container
Update Container & Export Container to CSV
After registering a container, you can update its details or export its data to CSV format for reporting purposes or analysis. To update a container, click the Update Container button under the Storage Management menu. A pop-up window will appear where you can upload an updated container file from your local computer. After selecting the file, click the Submit button to apply the changes and update the container details in the system. To export a container to CSV format, click the Export Container to CSV button under the Storage Management menu. A pop-up window will appear where you can enter the Container ID. Click the Submit button to export the container data in CSV format. This allows you to keep your container information up-to-date and easily accessible for analysis or reporting. Below are the outlined steps for both updating a container and exporting it to CSV format respectively.
Steps to update a container
Step 1: Click the Update Container button under the Storage Management menu. A pop‑up window will appear where you can upload the container file you want to update from your local computer.
Step 2: After selecting the file, click the Submit button to update the container details in the O2A Sample system.
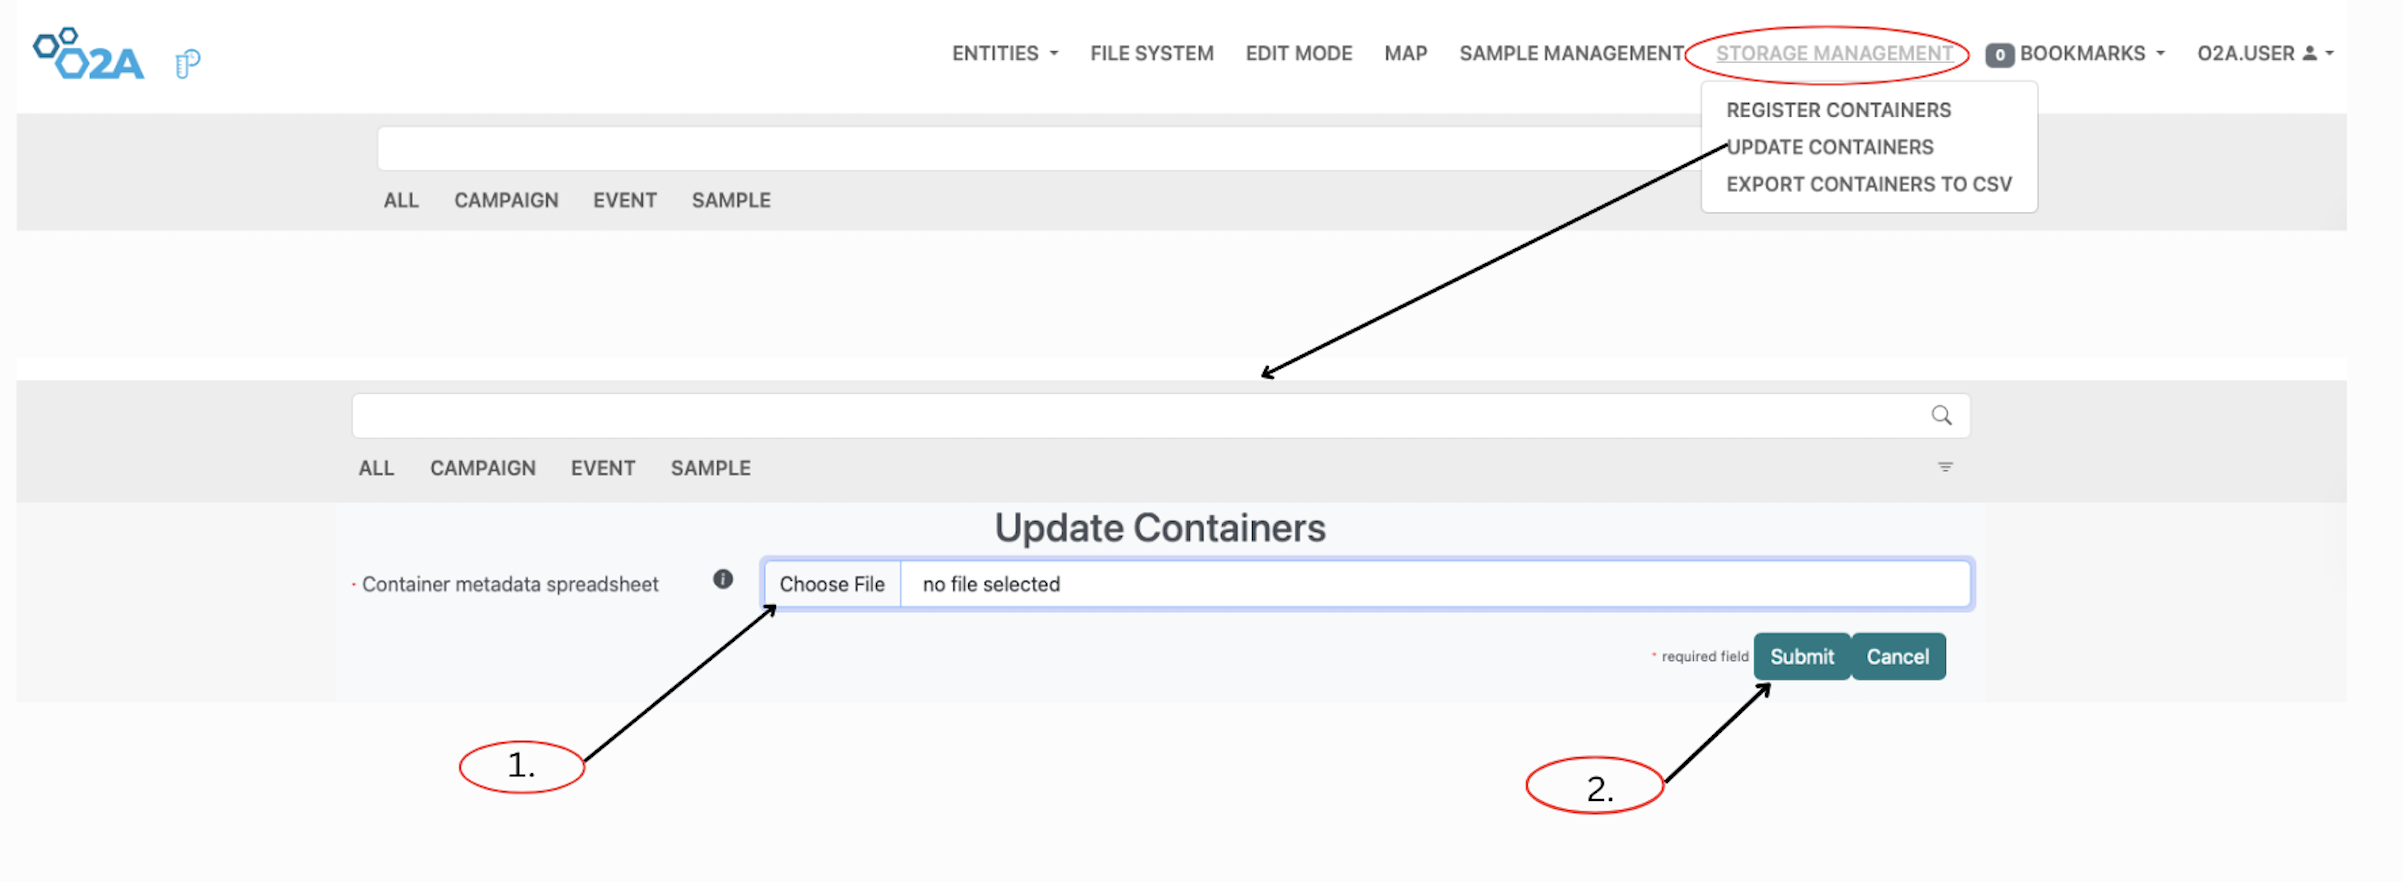 O2A SAMPLES SYSTEM: Steps on how to update a container
Steps to export a container to CSV
Step 1: Click the Export Container to CSV button under the Storage Management menu. A pop‑up window will appear. In the first field, enter the Container ID.
Step 2: Click the Submit button to export the container data in CSV format.
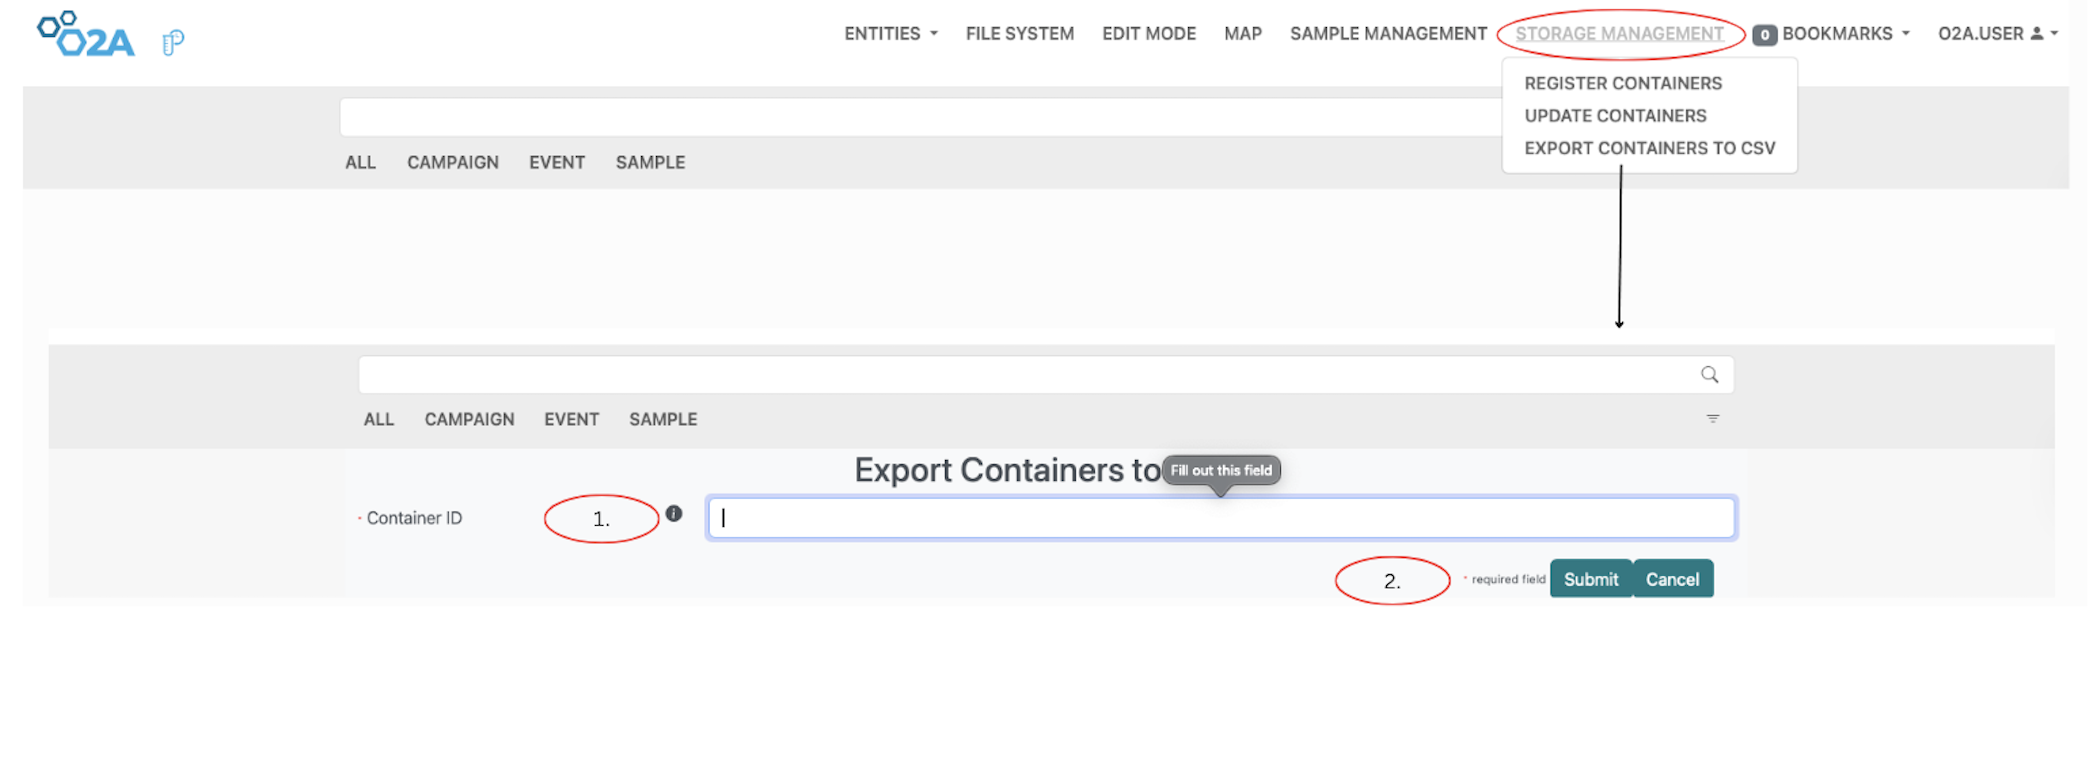 O2A SAMPLES SYSTEM: Steps on how to export a container to CSV
Maps
The Maps menu allows you to visualize the geolocation of your samples on a map. To access the Map menu, click on the Map option on the navigation bar. You can view the map to see the distribution of your samples and their corresponding storage locations. This can help you optimize your storage space and improve the efficiency of sample retrieval.The map interface may also include options to filter and search for specific samples based on their storage locations, allowing you to quickly find the information you need.
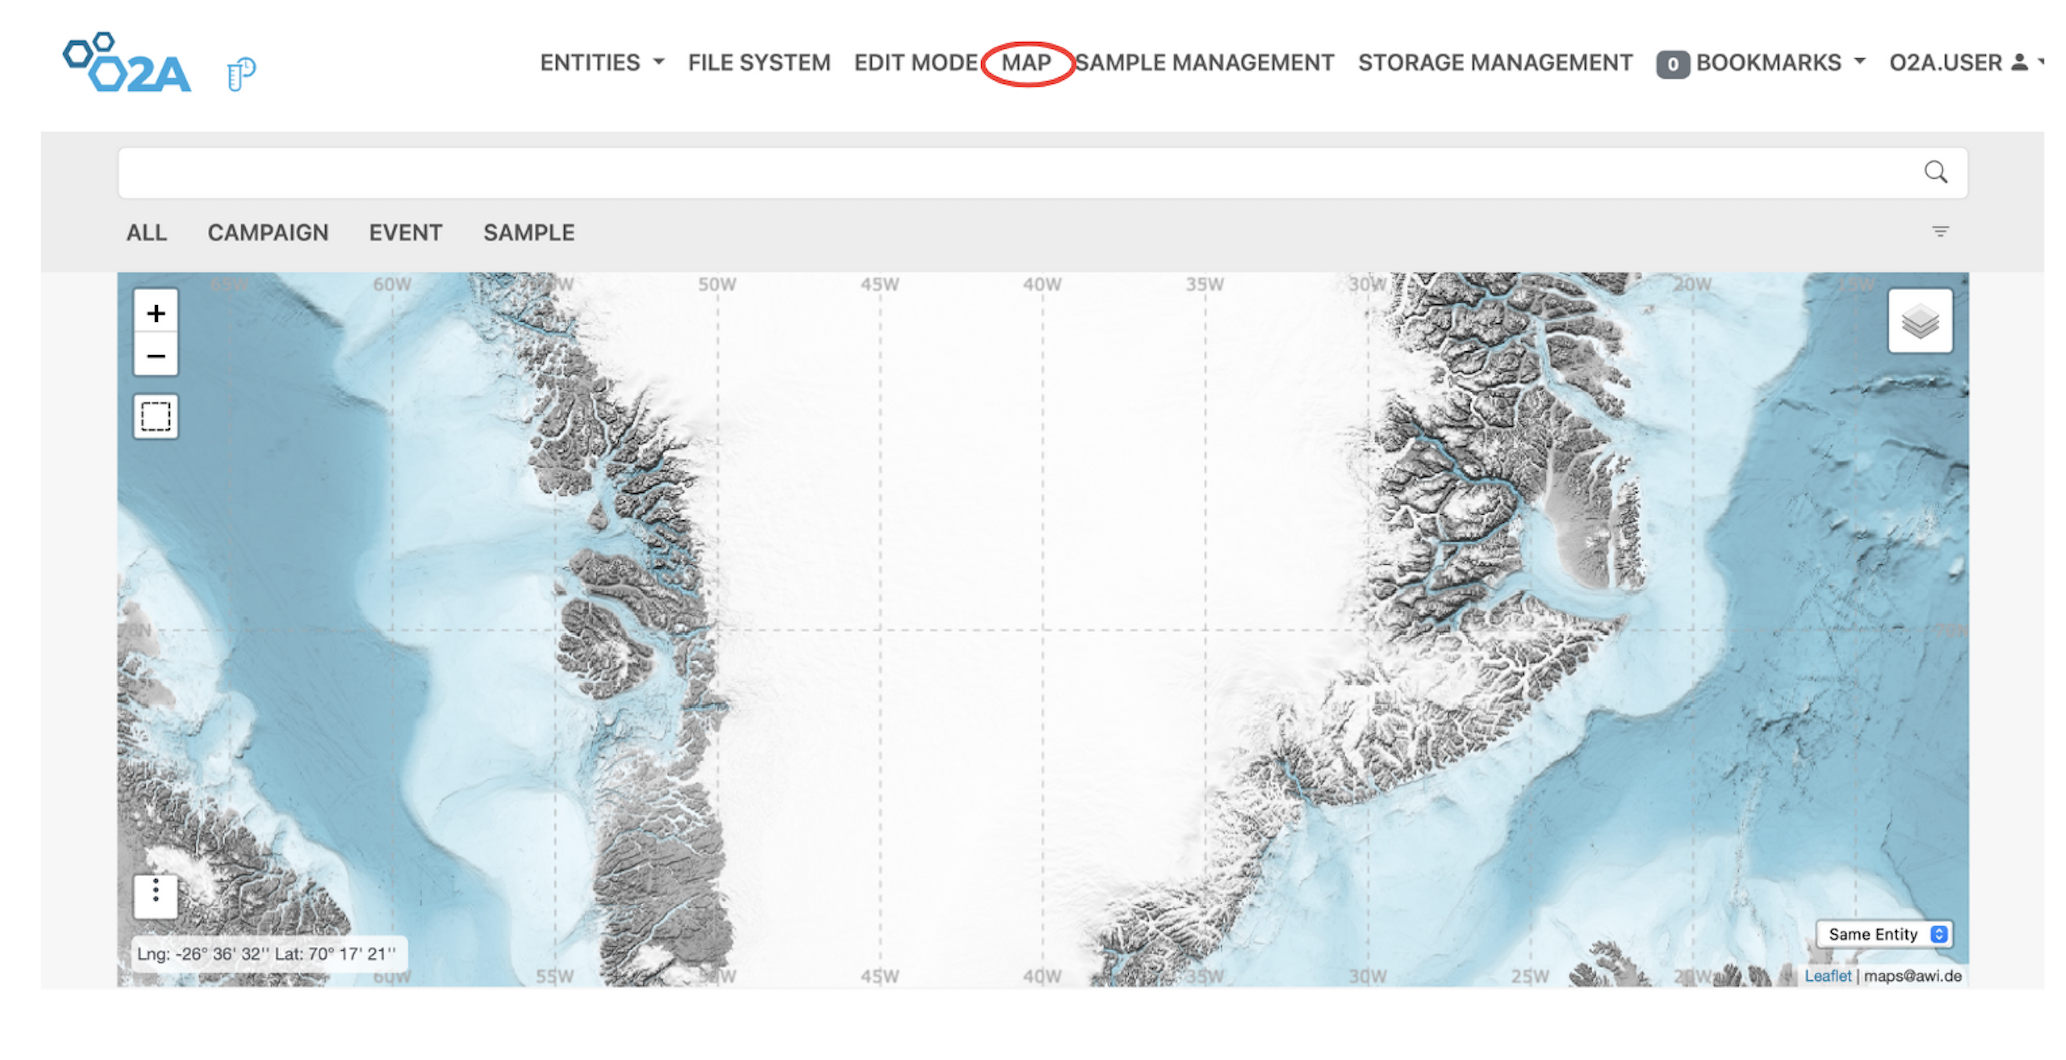 O2A SAMPLES SYSTEM: Map interface view
Bookmarks
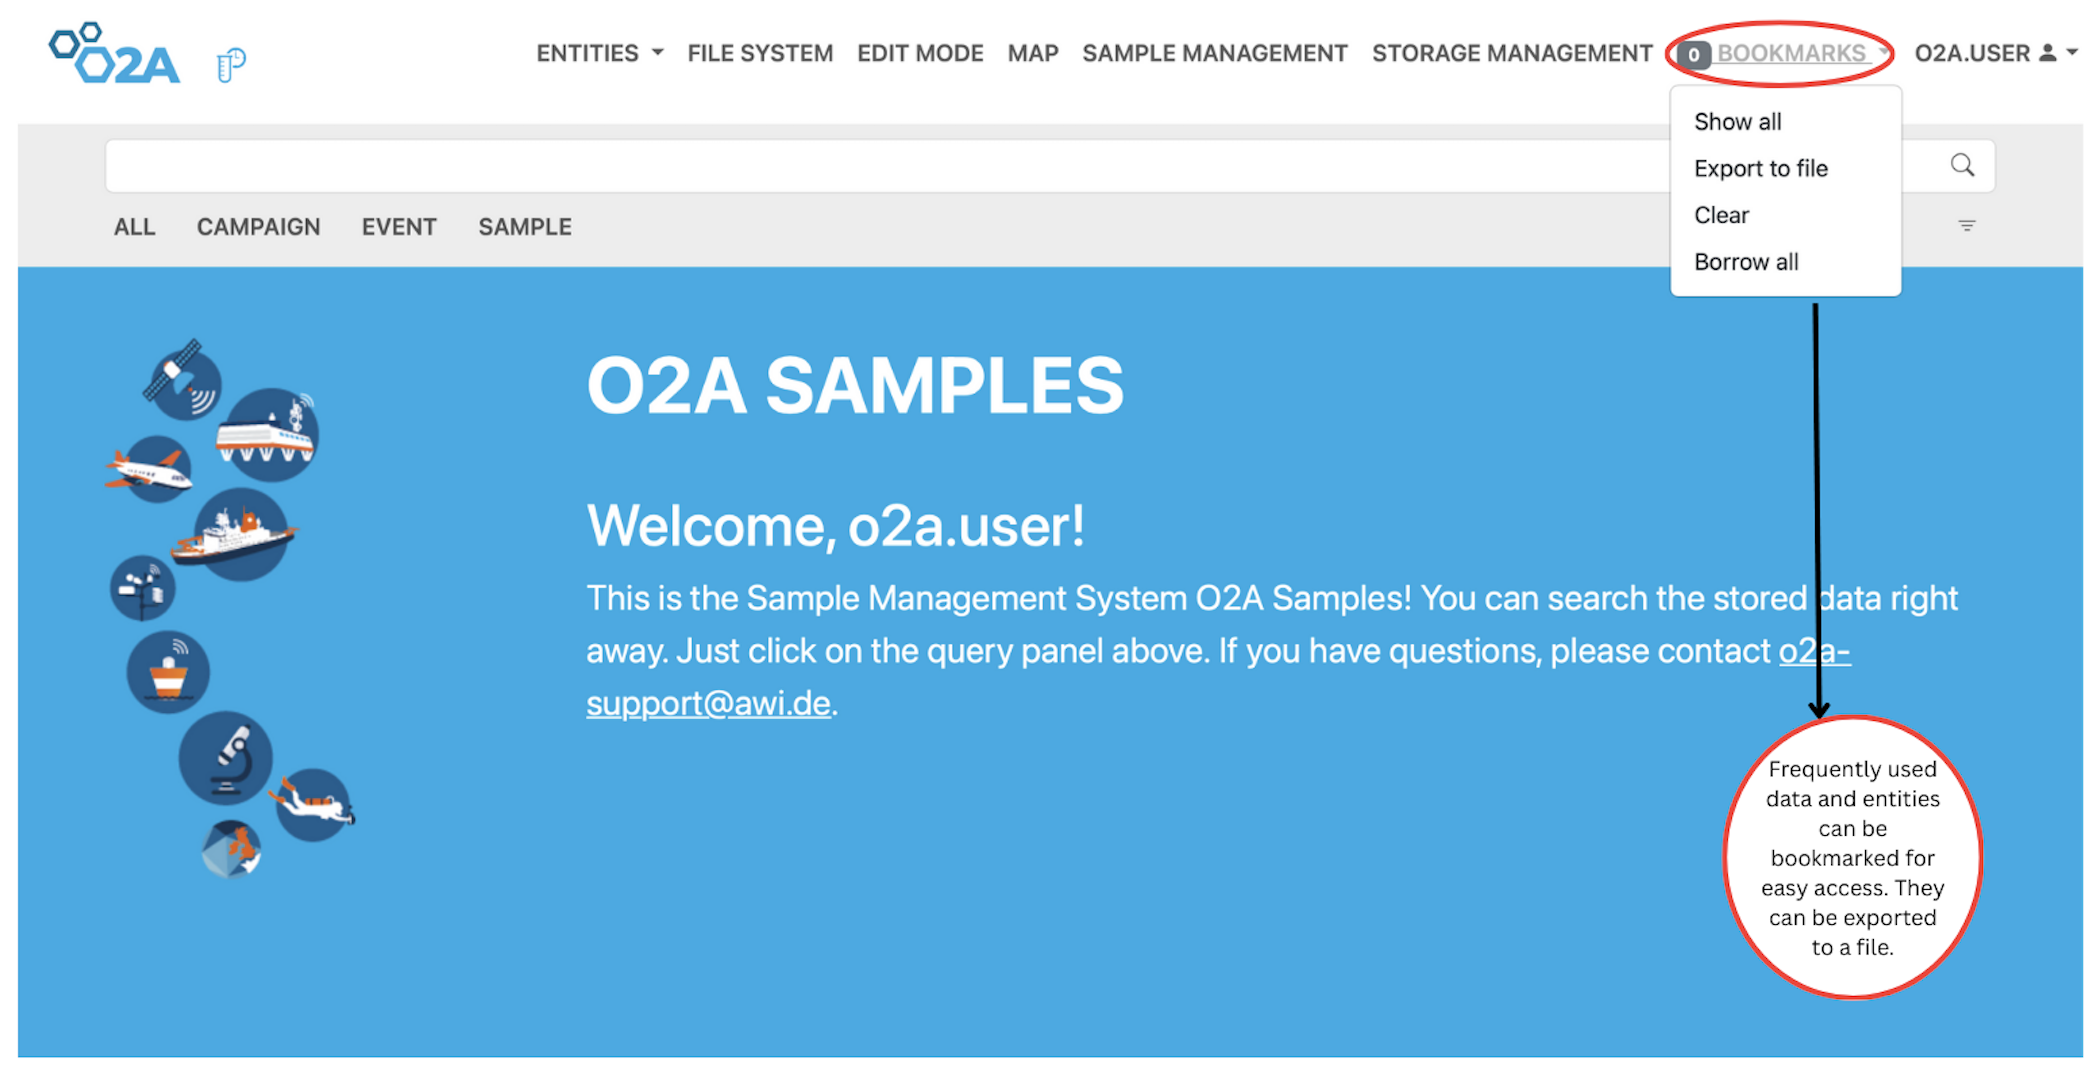
The Bookmarks feature allows you to save specific contents within the map for easy access in the future. To access the Bookmarks feature, click on the Bookmarks menu on the navigation bar. A drop-down sub-menu will appear showing other features like Show All, Export file, Clear and Bookmark All.
Bookmarks can be particularly useful for frequently accessed storage locations or for keeping track of important areas within your storage facilities. You can also manage your bookmarks by adding new ones, editing existing bookmarks, or deleting those that are no longer needed.
 O2A SAMPLES SYSTEM: Bookmarks interface view
Bookmarks : Borrow all
Another feature of the Bookmarks meun, is the Borrow all essentailly to loan multiple marked contents. Intially when you record a container, you would see a loan request on the Container menu. If you want to borrow a sample within that container, you can do that using the loan request but if you want more than one container, you can mark them and aftewards utilize the Borrow All feature to obtain all the marked containers.
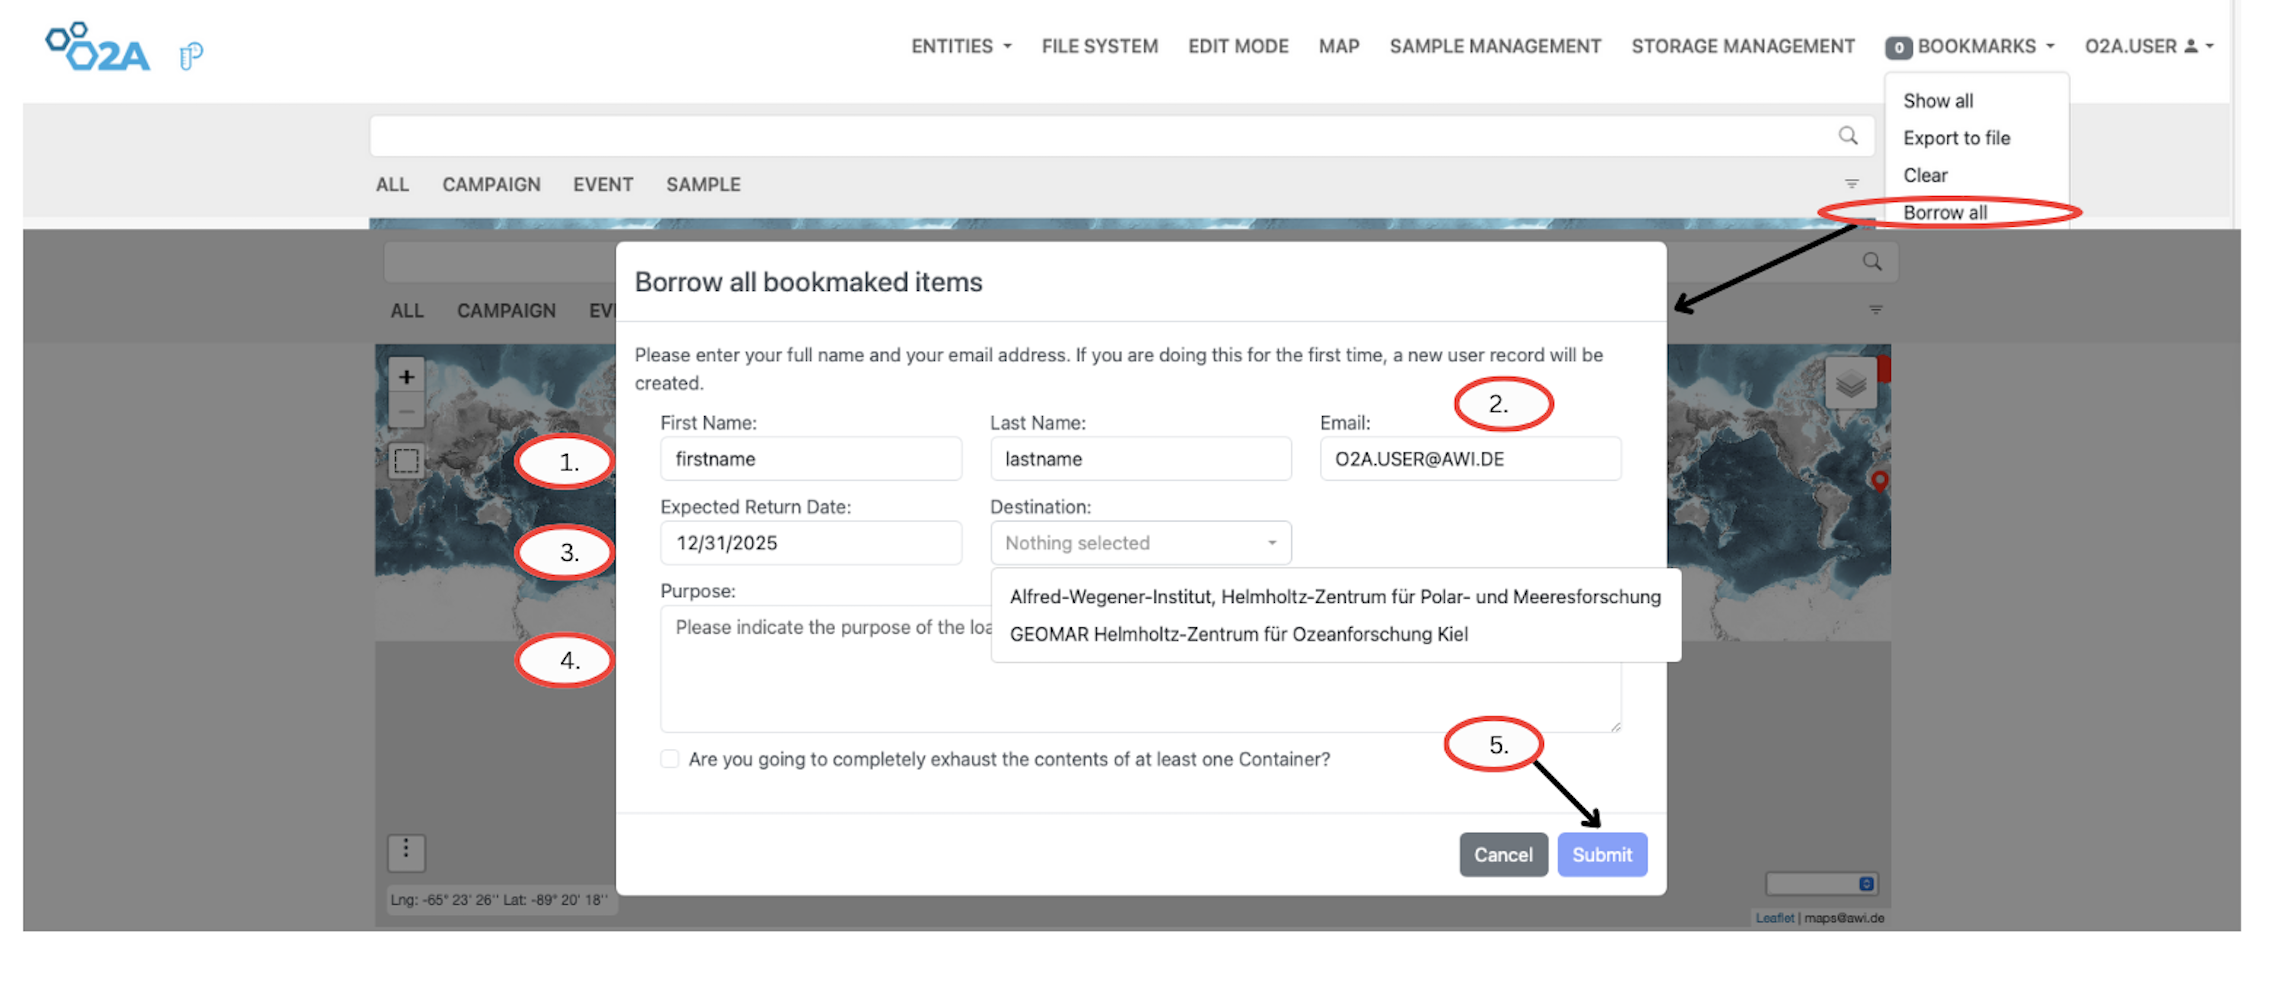
On clicking the Borrow All sub-menu, a pop-up form will appear where you can provide the required details for borrowing the previously marked contents. This form will typically include fields for your Name, Email Address, Expected Return Date, Destination, and Purpose of Borrowing. Once you have filled in all the necessary information and submitted the form, an email will be sent to the curator to initiate the loan process. This feature streamlines the borrowing prcocess, especially when you need to borrow multiple containers or samples at once.
 O2A SAMPLES SYSTEM: Borrow all bookmarks request form
To navigate the Borrow All feature,follow the steps outlined below. This will guide you through the process of borrowing all bookmarks contents efficiently.
Steps to borrow all bookmarks contents
Step 1: Click the Borrow All button under the Bookmarks sub‑menu. A pop‑up window will appear where you can enter your User Name.
Step 2: Enter your Email Address in the corresponding field.
Step 3: Specify the Expected Return Date for the borrowed bookmarks. In the field next to it, select the Destination.
Step 4: Enter the Purpose of borrowing the bookmarks in the Purpose field.
Step 5: Click the Submit button to complete the borrowing process.
Workflow for Sample Management: Registering Samples and creating sample templates
After a successful campaign where you have collected valuable samples and returned to base. The next task is to register, update and manage your sample. This is where the O2A Sample System comes to the rescue providing a Simplified Sample Metadata , Traceable and Standardized Sample management system.
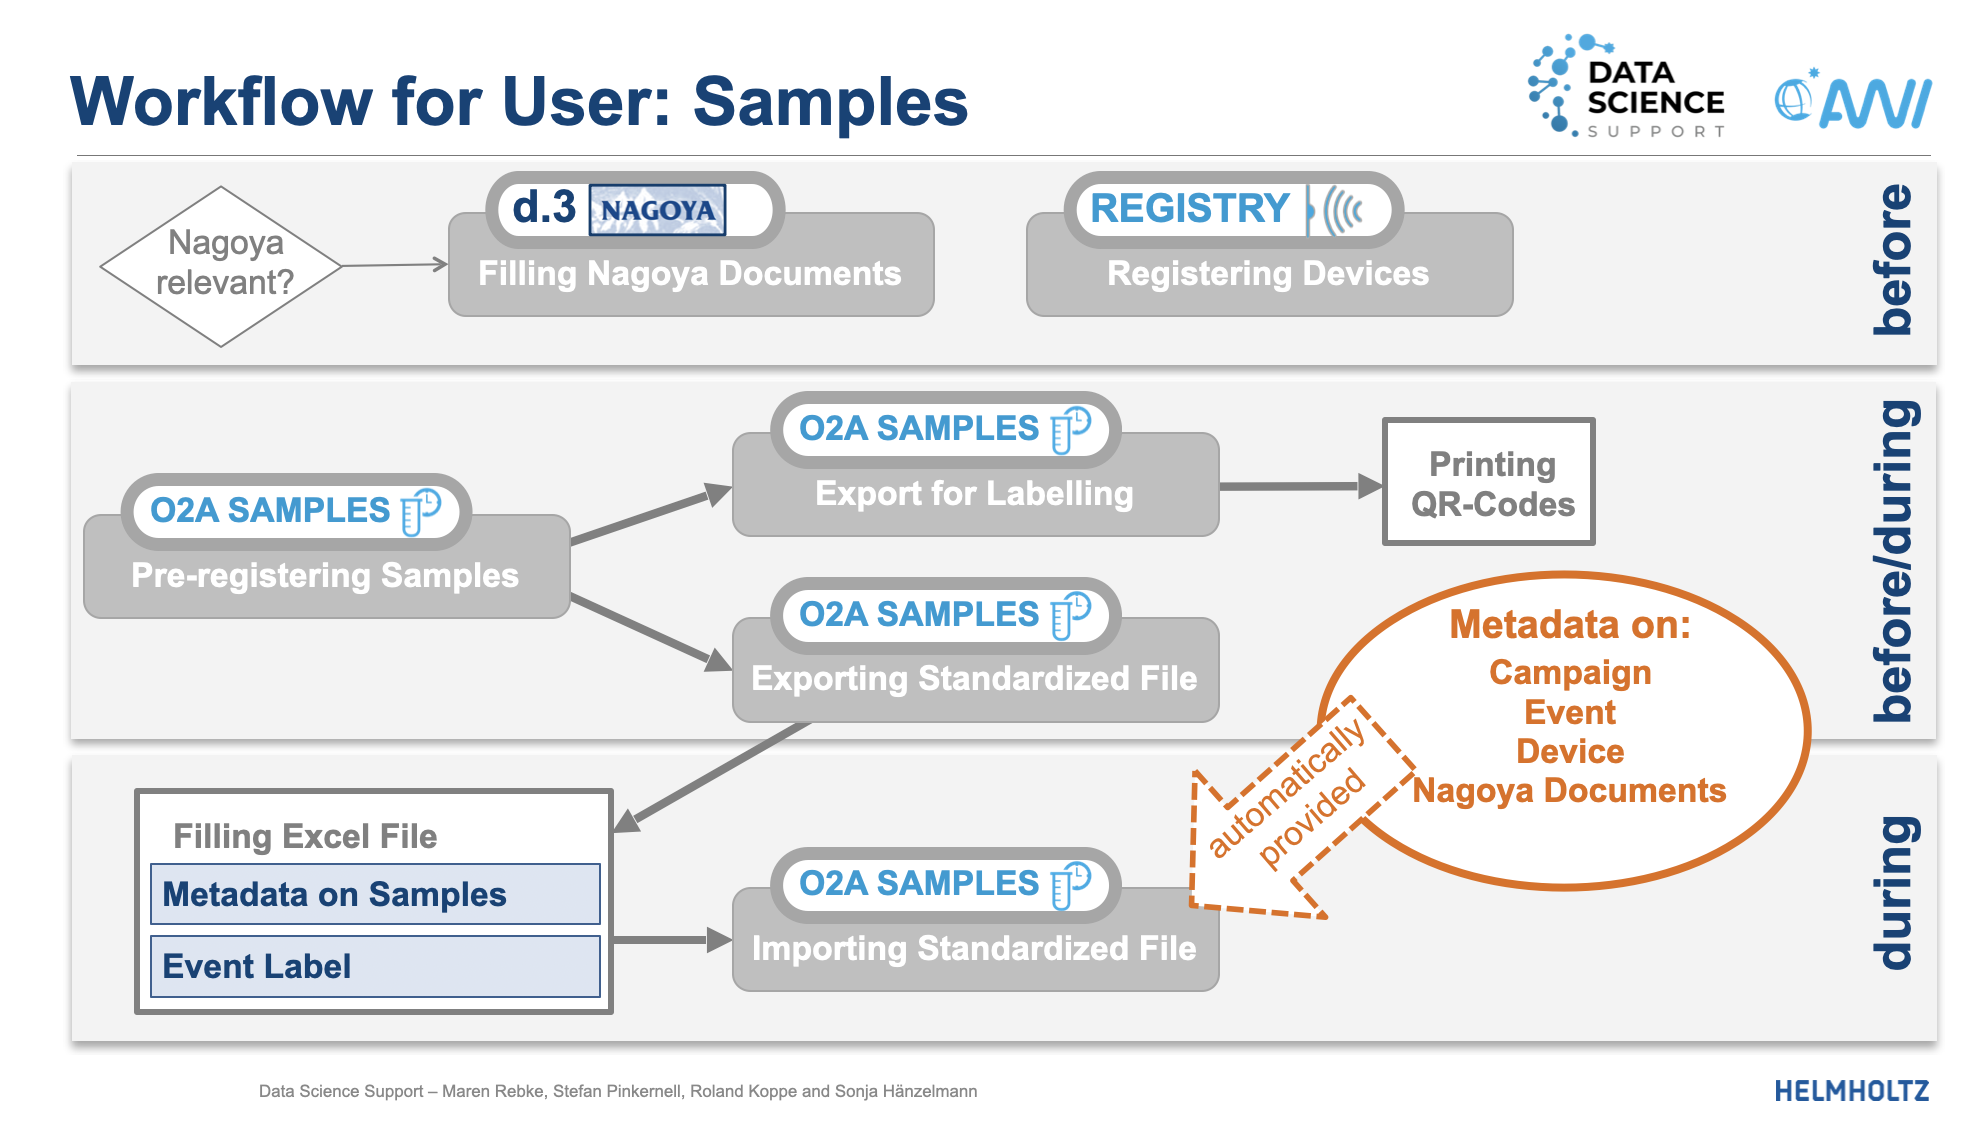 Flowchart illustrating the workflow for sample management in O2A Samples. The workflow for sample management in O2A SAMPLES is designed to be user-friendly and efficient, allowing you to easily register new samples, update existing ones, and manage your sample data effectively.
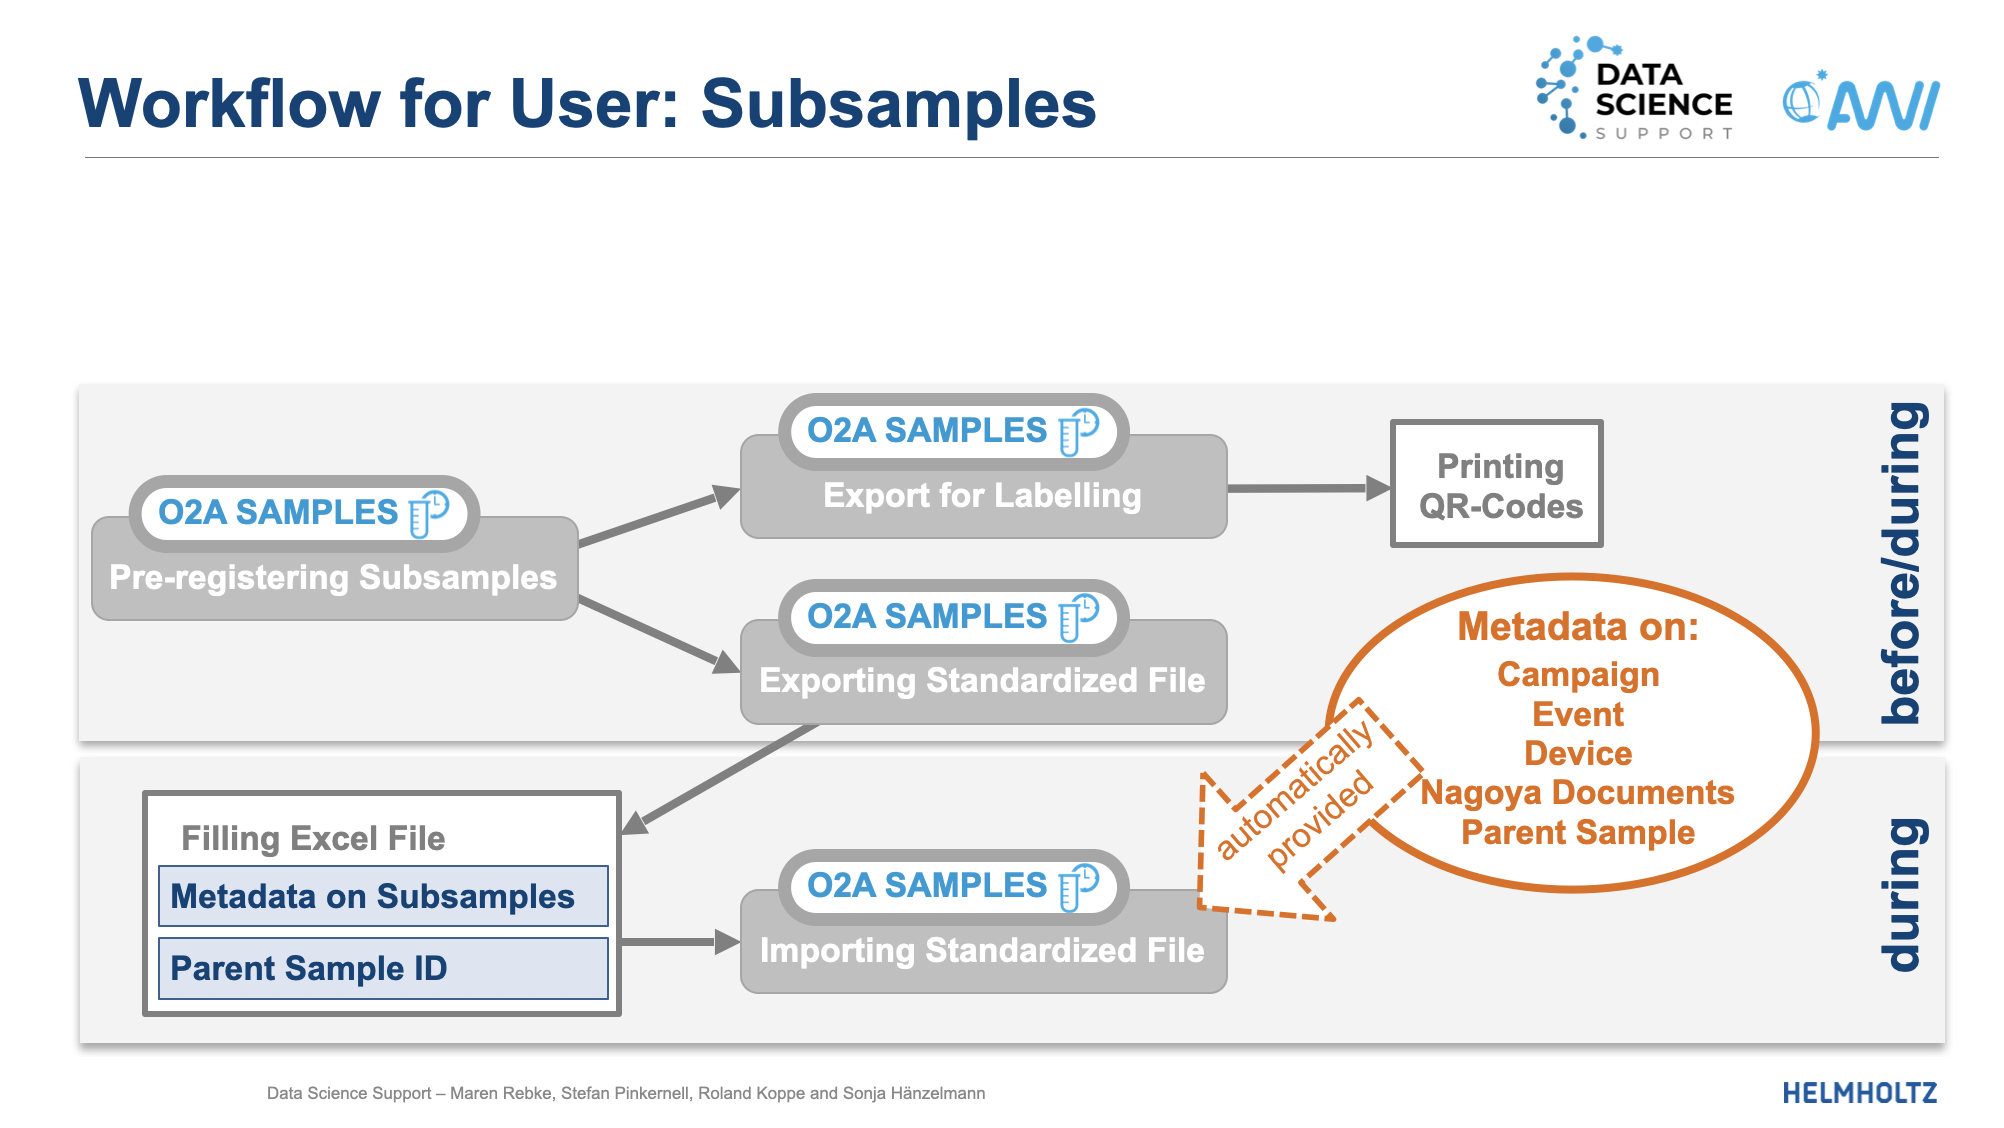 Flowchart illustrating the workflow for registering subsample in O2A Samples. This flowchart illustrates the workflow for registering subsamples in O2A SAMPLES. It shows how users can register subsamples that are derived from parent samples, ensuring a clear hierarchical structure for sample management.
Usually the workflow for sample management in O2A SAMPLES involves several key steps that users can follow to ensure their samples are properly registered and maintained within the system. Users start by registering parent samples, which represent the original physical samples collected during research. If there are any derived samples (child samples) that need to be registered, users can do so by linking them to their respective parent samples. This hierarchical structure allows for better organization and traceability of sample data.
After registering samples, users can update sample details as needed to keep the information accurate and up-to-date. This may include adding new metadata, correcting errors, or modifying existing data. Additionally, users have the option to export their sample data to CSV format. This feature allows for easy integration with other tools and software that support CSV files. Finally, users can create sample templates to standardize the registration process for future samples, ensuring consistency and efficiency in how samples are managed within O2A SAMPLES.
To summarize, the workflow for sample management in O2A SAMPLES can be outlined as follows:
Step 1: Register parent samples using the Register Sample feature. Step 2: If needed, register child samples that are derived from the parent samples using the Register Child Sample feature. Step 3: Update sample details as necessary using the Update Sample feature. Step 4: Export sample data to CSV format for analysis or reporting purposes using the Export Sample to CSV feature. Step 5: Create sample templates to standardize the registration process for future samples using the Create Sample Template feature.
Workflow for Sample Management: Registering Containers
You have now understood the workflow for registering samples, now let’s move to the workflow for registering containers in O2A SAMPLES. Containers are physical holders used to store or transport physical samples. Properly managing these containers is crucial for maintaining the integrity and organization of your sample collection. Once you have registered your samples, you can proceed to register the containers that will be used to store these samples. This involves providing details about the container such as its name, type, dimensions, and quantity. You can also update container details as needed to ensure that the information remains accurate over time. Additionally, you have the option to export container data to CSV format for inventory management or reporting purposes. Finally, organizing containers effectively is important for efficient storage management, and this can be achieved by utilizing the parent container option during registration to create a hierarchical structure for your storage system.
As with sample management, a subsequent workflow can be outlined for registering containers in O2A SAMPLES:
Step 1: Register new containers using the Register feature under the Storage Management menu, providing details such as container name, type, dimensions, and quantity. Step 2: Update container details as necessary using the Update Container feature to maintain accurate information about storage locations. Step 3: Export container data to CSV format for inventory management or reporting purposes using the Export Container to CSV feature. Step 4: Organize containers effectively by utilizing the parent container option during registration to create a hierarchical structure for storage management.
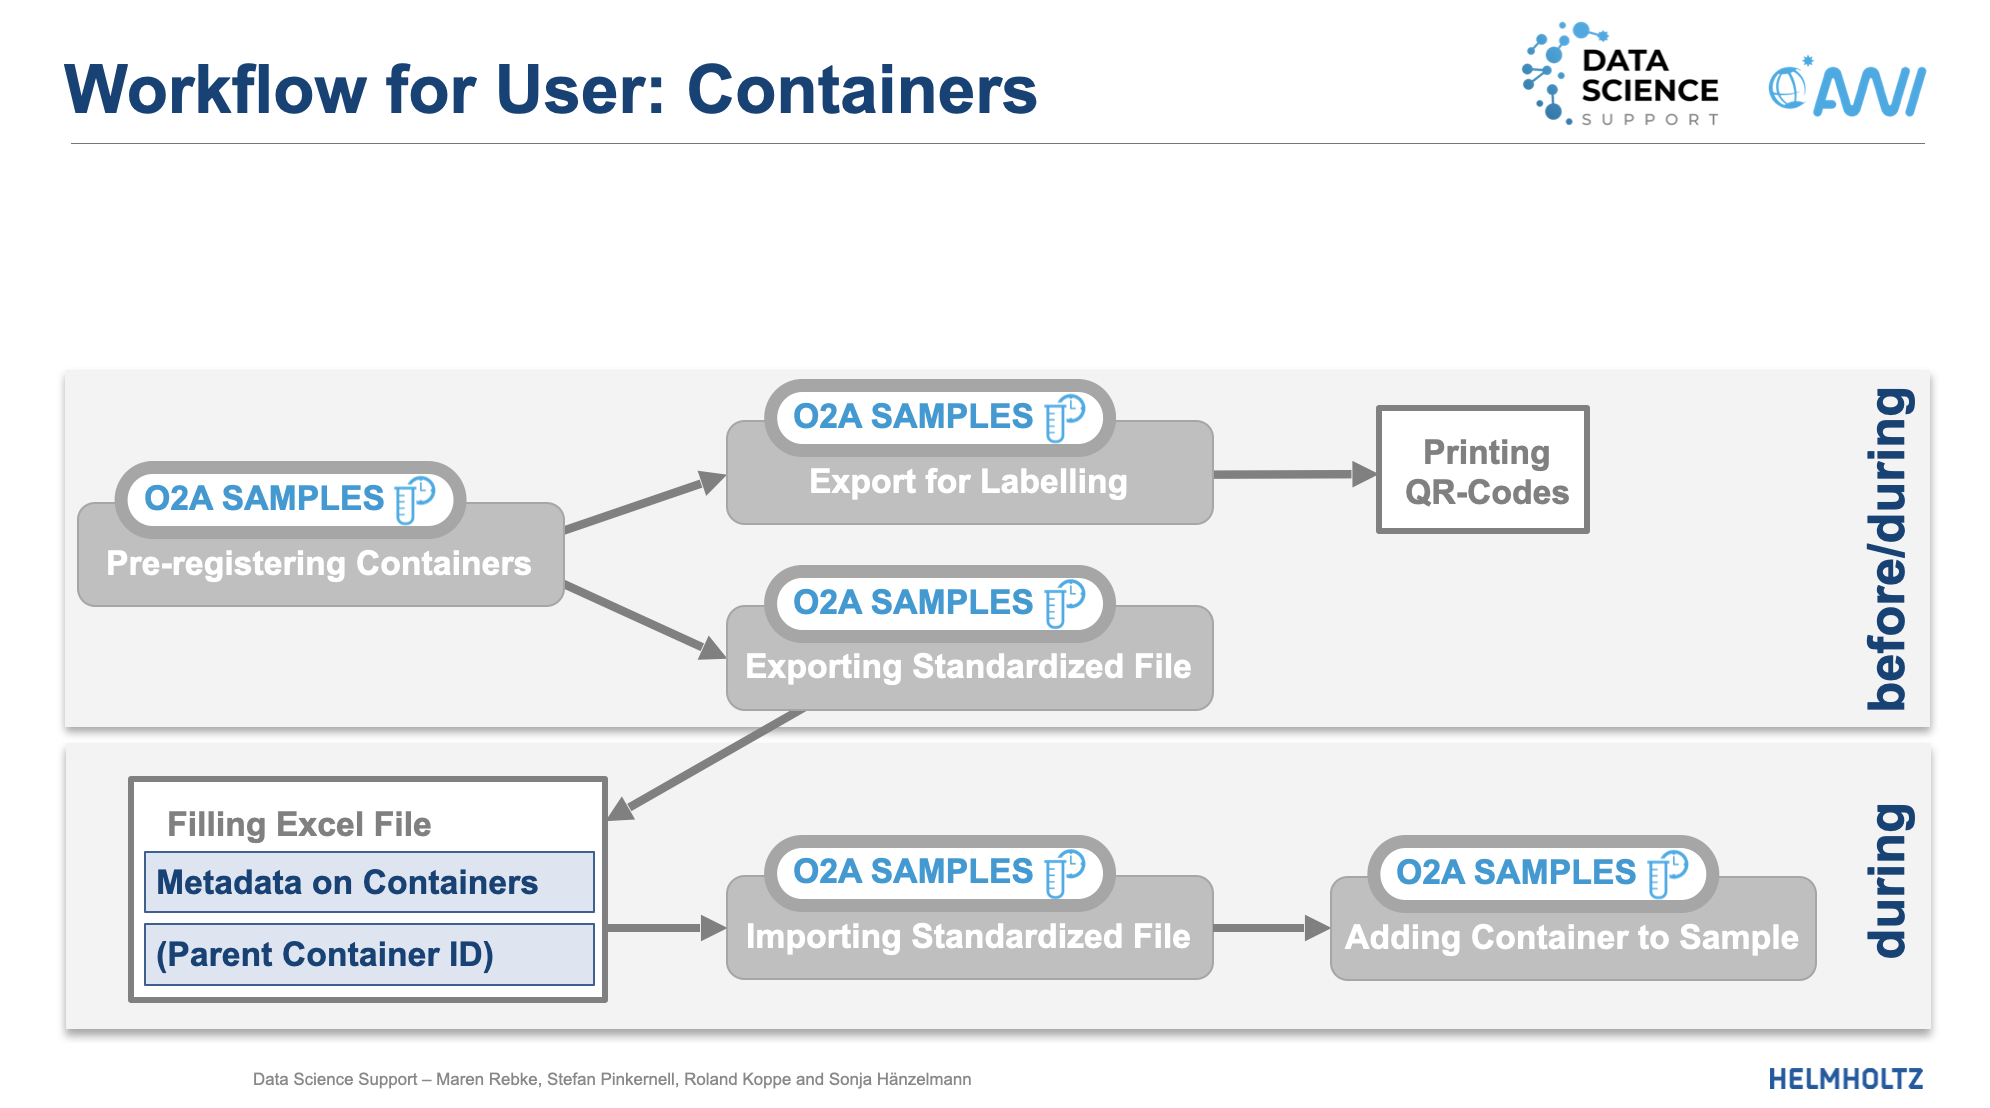 Workflow diagram illustrating the process of registering containers, updating details, exporting, and organizing container within the O2A SAMPLES.This workflow diagram illustrates the process of registering containers, updating their details, exporting container data to CSV format, and organizing containers effectively within the O2A SAMPLES system.
Block B
Going beyond the basic functionalities of O2A SAMPLES, Block B focuses on more advanced features such as querying samples based on specific criteria and utilizing additional tools within the system. The Query Samples feature allows users to search for samples based on various parameters, making it easier to locate specific samples or groups of samples that meet certain conditions.
To access the Query Samples feature, click on the Query Samples button under the Sample Management menu. This will open a new interface where you can enter your search criteria, such as sample properties, metadata, or other relevant information. Once you have entered your query parameters, click the Submit button to execute the search. The system will then display the results that match your query, allowing you to quickly find the samples you are looking for.
The Query Samples feature is particularly useful for managing large datasets, as it enables you to filter and sort through your samples efficiently based on specific attributes or conditions You can query samples associated with a particular Campaign, Event or Sample. This allows you to retrieve relevant sample information based on the context of your research or project. For example, you can query samples that are linked to a specific campaign to analyze the data collected during that campaign, or you can query samples associated with a particular event to understand the conditions under which those samples were collected. This level of querying helps you to organize and access your sample data in a way that is meaningful and relevant to your research objectives.
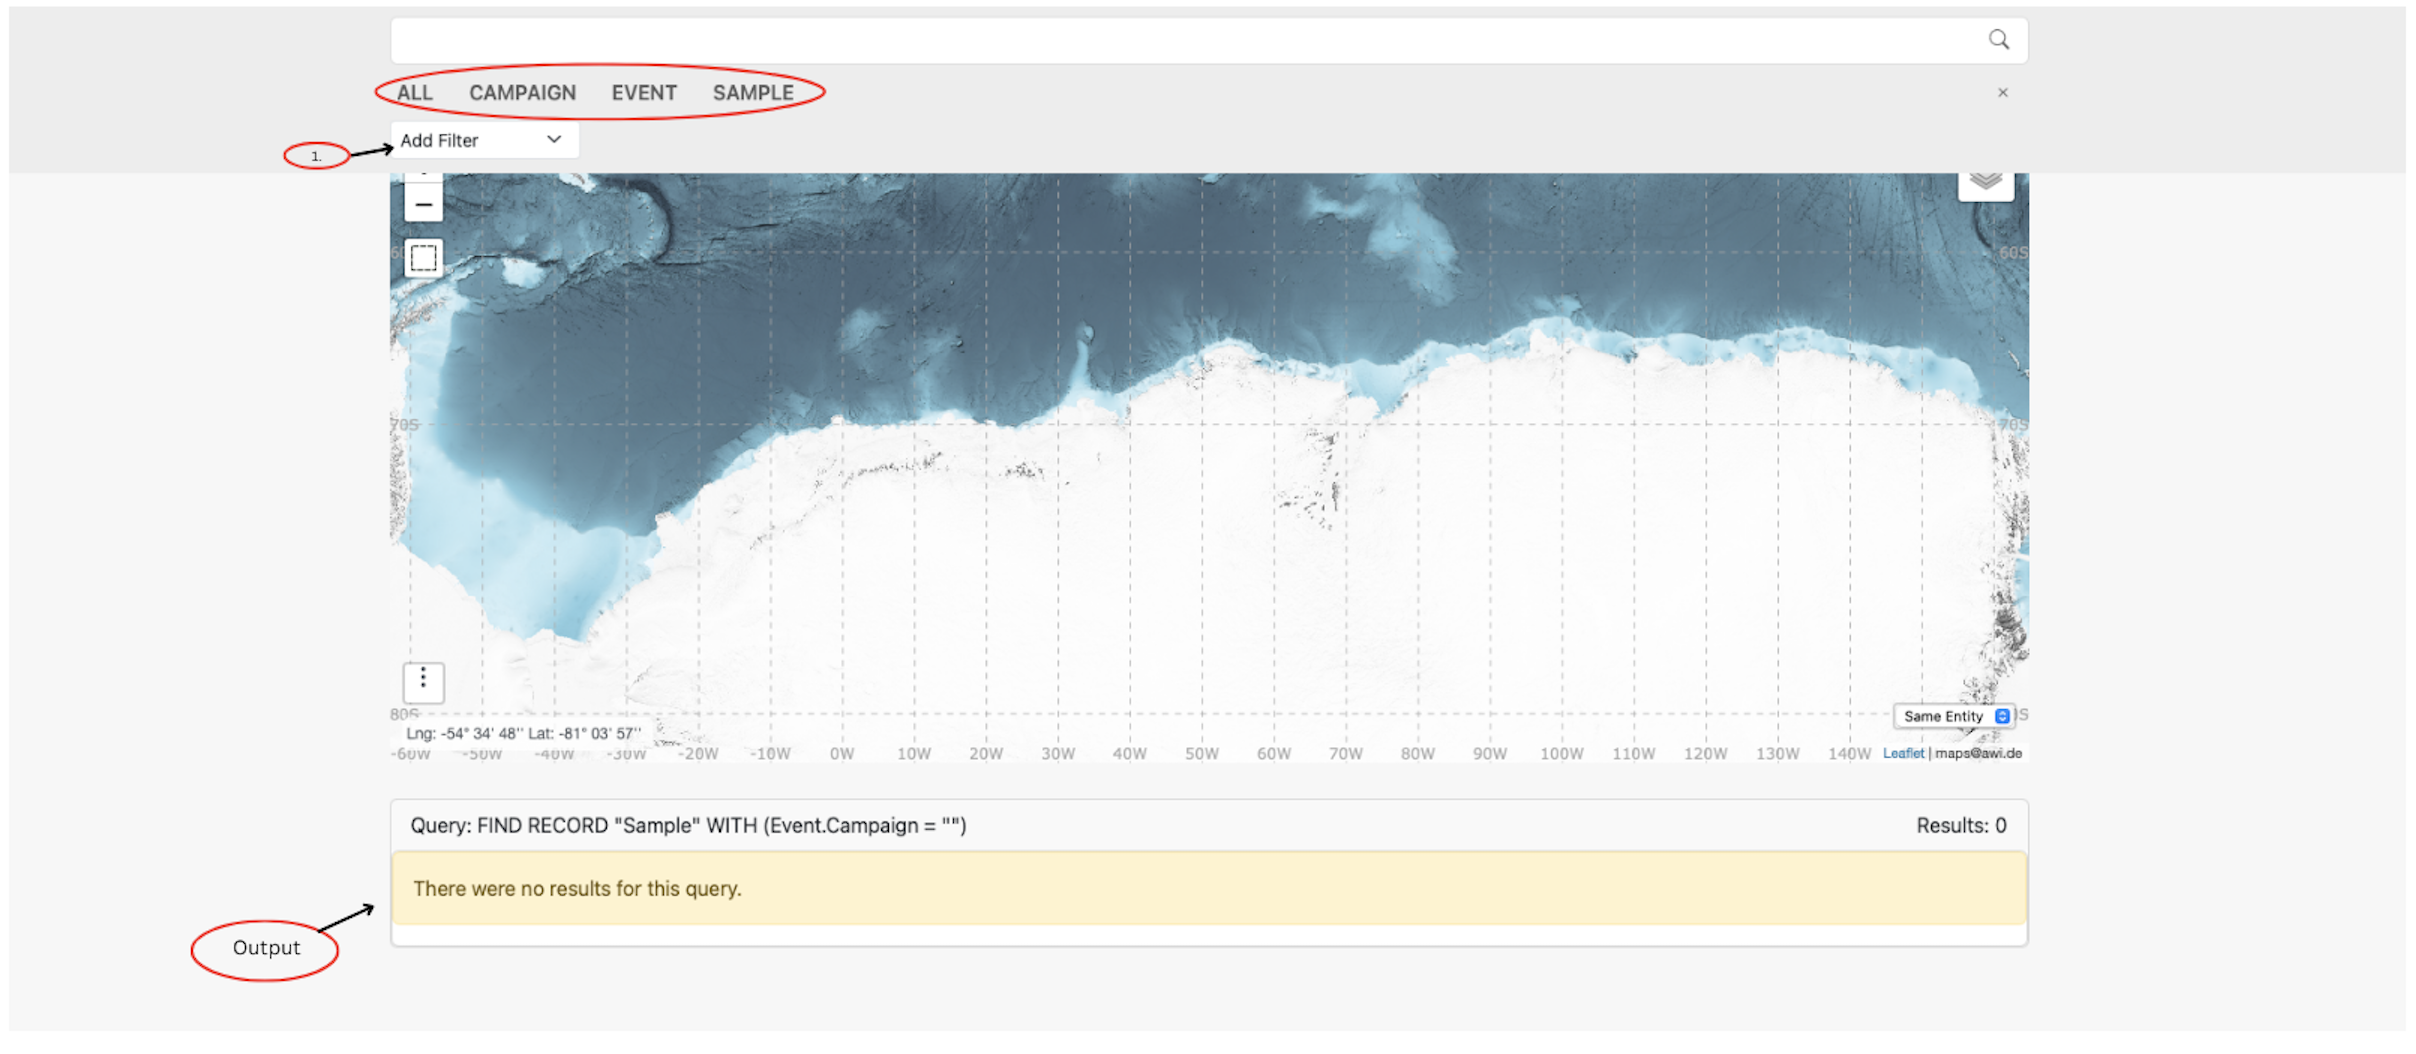 O2A SAMPLES SYSTEM: Query samples interface view
References
- Data model tutorial Data model tutorial
- CaosDB Research Data Management for Complex, Changing, and Automated Research WorkflowsCaosDB Research
- BIS Manual BIS Manual